Thursday, May 31, 2012

Ruler of the Roost


Just a quick reminder that today is the last day to order from the 2011-2012 Idea Book and Catalogue.  Accessories will still be available as quantities last but if there is a retiring stamp set (or 2 or 3...) that you've had your eye on order it today because tomorrow it will be gone for good!!

I found this cute little chicken on Pinterest and I just had to make her!  I know chicken's don't normally sit atop weather vanes (my husband's words, not mine); but my artistic license gave way again :)

Supplies:

Stamp set: Fun and Fast Notes (retired), My Digital Studio (Ruler of the Roost sentiment)
Cardstock: Whisper White, Cherry Cobbler, Basic Black, Summer Smooches DSP
Ink: Pool Party, Crumb Cake
Accessories: Fashionable Hearts embosslits die, Cupcake Builder punch, Stripes embossing folder, 1 3/4" circle punch, 1/2" circle punch, Modern label punch, white gel pen, Tombow liquid glue, Stampin dimensionals, sponges

Blue skies and weedy flower beds are calling - have a great day!!

Thanks so much for looking!
webbanner-002copy Pin It
Wednesday, May 30, 2012

Garden Sunset


While working on my watercolor post from a couple days back, I kept envisioning how the Flower Garden embossing folder might look with a brayered sunset.  Needless to say this card was actually completed before the watercolor ones were LOL.  I'm really happy with the results - the embossing folder adds so much texture and dimension to the flowers and the black really "pops" against the sunset. Here's how I did it.

Supplies:

Stamp sets: Nature Walk, Word Play
Cardstock: Whisper White, textured Cajun Craze, Always Artichoke, Basic Black, Everyday Enchantment DSP
Ink: Daffodil Delight, Pumpkin Pie, Cajun Craze, Old Olive, Basic Black
Accessories: Brayer, Big Shot, Basic Black marker, Top Note die, Flower Garden embossing folder, snail, dimensionals

Begin by cutting a piece of Whisper White cardstock with the Top Note die. 
Brayer entirely with Daffodil Delight, then 2/3 of cardstock from the top down with Pumpkin Pie, then the top 1/3 with Cajun Craze.
Sponge Old Olive along bottom edge of top note to give the appearance of a grass line.
Heat set ink with a heat gun.  This step is important to ensuring your cardstock won't tear when you run it through the Big Shot.  Even if it is slightly damp your project will be ruined.
Line up your top note in your embossing folder as to how you'd like your flowers placed; run it through the Big Shot.  In the case of this card I ran it through twice so I could have an additional flower on the left hand side of the top note.  Make sure to use the embossing side of the folder, not the debossing side for this technique.
Color in the embossed image with a Basic Black marker.  The bee from the Nature Walk set and the sentiment from the Word Play set were added with Basic Black ink.
Assemble card.

Thanks so much for looking!


Pin It

Tuesday, May 29, 2012

Fuzzy Wuzzy Teddy & Faux Quilt


Supplies:

Stamp sets: Up in the Air
Cardstock: Whisper White, Lucky Limenade, Rich Razzleberry, Berry Blossoms DSP, Summer Smooches DSP, Chocolate Chip, Crumb Cake
Ink: Rose Red
Punches: Modern label punch, 1 3/4" circle, Large Oval, Heart to Heart, 1 1/4" circle, 3/4" circle, 1/2" circle
Accessories: Square lattice embossing folder, Lucky Limenade ruffled ribbon, Stampin' dimensionals, glue stick, Tombow glue, 2 way glue pen, paper piercing pack, piercing tool, white gel pen, Basic Black marker, sponge dauber


Let's begin with the teddy bear:

Head: 1 3/4" circle in Chocolate Chip
Muzzle: Large oval in Crumb Cake
Ears: Outer ear 3/4" circle in Chocolate Chip (make 2)
         Inner ear 1/2" circle in Crumb Cake (make 2)
Body: 1 3/4" circle in Chocolate Chip and 1 1/4" circle in Crumb Cake
Arms and Legs: Modern Label punch in Chocolate Chip (make 4)
Feet: Heart to Heart punch - use medium heart cut in half for feet (make 2 in Chocolate Chip), use small heart cut in half for feet pads (make 2 in Crumb Cake)

Begin by punching out all pieces.  Then using a glue stick, apply glue to each piece and adhere to a used dryer sheet.  Carefully cut out each piece and assemble the bear with Tombow liquid glue.  Once dry, add eyes and nose with Basic Black marker and highlight with white gel pen.  Add cheeks with Rose Red ink and sponge dauber.  Finish off by adding a bow onto the neck of the bear.

Now on to the Faux Quilt:

Cut a base piece of cardstock 3 3/4" x 3 3/4". 
Choose 3 co-ordinating papers and cut as follows (all squares are 1 1/4"):
  • Pattern #1 - cut 5 pieces; cut one piece in half diagonally, then those 2 pieces in half again.
  • Pattern #2 - cut 2 pieces; cut both pieces in half diagonally.
  • Pattern #3 - cut 1 piece; cut in half diagonally, then those 2 pieces in half again.

Glue Pattern #1 down first; the full squares in each corner and the quarters in between each full square along the edge of your base cardstock.


Glue Pattern #2 pieces as shown above.


Glue Pattern #3 pieces as shown above.  At this point you could add faux stitching with your paper piercing mat pack, piercing tool, and white gel pen to give it further detail.  My first example in the teddy bear card uses this technique.


To complete the Faux Quilt, choose an embossing folder and run it through your Big Shot machine.  In this case, the Square Lattice embossing folder was used.


Complete your card.
Supplies:

Stamp sets: Greeting Card Kids, Create a Cupcake
Cardstock: Island Indigo, Daffodil Delight, Whisper White, Summer Smooches DSP
Ink: Basic Black
Accessories: Square Lattice embossing folder, Versamark marker, clear embossing powder, Stampin Write markers, Modern label punch, 2 way glue pen, snail adhesive

Thanks so much for looking!

webbanner-002copy
Pin It

Monday, May 28, 2012

Watercolored Flowers

This weekend was yet another wet one that left us stuck indoors.  When I asked my 2 year old son what we should do to pass the time he said "Color!".  So while he colored garbage trucks and tractors I decided to practise my watercoloring techniques.  If you haven't tried this technique before, give it a try; the results can be stunning with a little practise.

There are a couple of key tools that are needed to make your project a success:
  • If your using a stamped image, always use Staz-on ink to prevent smearing when you apply your color
  • Always use watercolor paper; it ensures your colors blend beautifully together
  • A blender pen or aquapainter
I use one of two techniques when I watercolor; either with a blender pen and ink pad (used in my first example) OR Write markers in a few different shades of the same color family (used in my second example).  Let's get started!


Ink Pad and Blender pen Method - great for beginners
While your ink pad is closed give the lid a gentle squeeze.  Doing this will transfer a little pool of ink into the lid.  You can now pick up the ink with the tip of your blender pen and begin watercoloring! 

Supplies:

Stamp set: Word Play
Cardstock: Watercolor paper, Basic Gray, Primrose Petals
Ink: Basic Gray, Primrose Petals, Raspberry Ripple
Accessories: Manhattan flower embossing folder, blender pen, metallic brads, sponges, snail adhesive


Marker only Method - slightly more advanced method
Begin by adding your darkest color first where your shadows might fall.  Next, using a shade lighter, begin applying the ink using a circular motion, picking up some of the darker color and blending outward.  A light hand is key when using this method.  If you apply too much ink your image will just appear colored and lack the soft watercolored look your aiming for.

Supplies:

Stamp set: none
Cardstock: Watercolor paper, Gumball Green, Calypso Coral, Wisteria Wonder
Ink: Island Indigo, Wisteria Wonder, Calypso Coral
Write Markers: Perfect Plum, Wisteria Wonder, Pink Pirouette, Calypso Coral, Gumball Green
Accessories: Flower Garden embossing folder, Perfect polka dots embossing folder, Everyday Enchantment brads, snail adhesive


Thanks so much for looking!

webbanner-002copy Pin It

Friday, May 25, 2012

Puddle Jumping!


I made this card about a month ago but hadn't had a chance to post it yet.  With all the rain over the last few days it seemed a great time to share it with you.  I just love the way her rain jacket and boots turned out...they look like real rubber!  Unfortunately, this card does use a few retired SU products; but I think there may be a surprise or two in the new catalogue you could use to replicate this card... ;)

Supplies:

Stamp sets: My Digital Studio (to create greeting)
Cardstock: Whisper White, So Saffron, More Mustard, Island Indigo, Summer Smooches DSP, Build a Bear Pawsitively Prints DSP (retired)
Ink: Pool Party, Island Indigo, Lucky Limenade, Pretty in Pink
Accessories: Build a Stocking punch (retired), 1 3/4" scallop circle punch, Modern label punch, 3/16" corner punch, brayer, Versamark marker, clear emboss powder, white gel pen, sponges, Old Olive write marker, Certainly Celery write marker, Wild Wasabi write marker, Stampin' dimensionals, 2 way glue pen

In an upcoming post I will be doing a tutorial on creating water ripples like the one on this card so stay tuned! 

Happy Puddle Jumping!!

webbanner-002copy Pin It

Thursday, May 24, 2012

Rose Red Sunset


Today's card is one of those "happy accidents" that sometimes happens when I'm creating.  Do you ever start a project with an idea in mind then begin working on it and it become something completely different?  That's exactly what happened with this card.  I was testing color combo's on a piece of scrap paper (you should see the backside of this card LOL) when it hit me that what I was doing sure looked like the start of a red sunset!  Here's a quick overview of how I completed it:

Supplies:

Stamp sets: Just Believe, Christmas Lodge
Cardstock: Whisper White, textured Rose Red, Basic Gray
Ink: Baja Breeze, Daffodil Delight, Basic Black
Accessories: Basic Black Write marker, White gel pen, sponges, snail adhesive

I masked off the horizon line about 1/3 up from the bottom of the cardstock.  I also masked off the sun using a 1/2" circle punch and a post it note.  I sponged Basic Gray about 1/3 of the way up from the horizon line, making the horizon line slightly darker for depth.  I then sponged Rose Red above the gray, then Baja Breeze above the Rose Red.  I removed the mask from the sun and using the negative portion of the sun mask sponged Daffodil Delight.
I then flipped my masks over to work on the water portion.  I sponged Rose Red darkest at the horizon line, fading the color out as I reached the bottom portion of my cardstock.  I sponged Daffodil Delight on the sun's reflection using the same method as the sun in the sky, then sponged the bottom edge of the water with Baja Breeze.
After removing all masks I stamped the tree line randomly with Basic Gray and Basic Black using just the upper portion of the tree from the Christmas Lodge stamp set.  I added water lines with a white gel pen, freehand drew the little lone loon, and stamped the saying from the Just Believe set in Basic Gray.

Hope you enjoy my "happy accident"!  Thanks so much for looking!


webbanner-002copy Pin It

Wednesday, May 23, 2012

Misty Morn


Yet another rainy day in my neck of the woods; sure am glad I got a little dirt digging in over the long weekend!  Here's to hoping the forecast for the remainder of the week is wrong and the sun comes out.

Today's card is my depiction of an early morning  misty sunrise.  Hope you like it :)

Supplies:

Stamp sets: Four Frames, Nature Walk
Cardstock: Whisper White, Basic Black, Soft Suede, Wild Wasabi
Ink: Daffodil Delight, Pumpkin Pie, Cajun Craze, Old Olive, Crumb Cake, White craft ink
Accessories: Brayer, Basic Black Write marker, Sahara Sand marker, sponges, white gel pen, snail adhesive

Began by brayering Daffodil Delight on an angle about 1/3 of the way across Whisper White cardstock.  The remaining 2/3 of the cardstock was brayered with Pumpkin Pie.  Sponged Cajun Craze along the top edge and Pumpkin Pie edge to add depth.
Stamped the flower image from the Nature Walk set along the bottom in Old Olive ink, then sponged more Old Olive ink along the bottom of the cardstock.
The fence was drawn freehand with a Basic Black marker and highlighted with white gel pen.  Bird from Four Frame stamp set was then added to the top of the fence and colored in with Sahara Sand marker and highlighted with a white gel pen.
The mist was created with White craft ink.  The technique here is to use a light hand; building layers to get the desired effect.  Remember, you can always add more but it sure is difficult to take away!! When the desired look is achieved, heat set the ink to prevent smudging.

Thanks so much for looking!

webbanner-002copy
Pin It

Tuesday, May 22, 2012

Faux Cloisonne Technique

Two posts today!! I thought I'd share the other technique we did at this weekend's card class.  Faux Cloisonne is another super simple technique that can look really elegant depending on the papers you choose to use. 
Supplies required for this technique:
  • Glossy magazine page or Designer Series paper
  • Outline image stamp
  • Versamark
  • Embossing powder
Choose an outline image stamp and either a glossy magazine page or brightly colored Designer Series paper.  Try to avoid images with a lot of white space, text, or faces (unless that's the look your going for of course! LOL).  Load your stamp with Versamark and stamp.  Cover the image with embossing powder and heat set.  Trim your image and apply to your project.  Below are two examples on how I used this technique; along with a supply list for each.

Supplies:

Stamp sets: Fabulous Florets
Cardstock: Very Vanilla, Cherry Cobbler, Elegant Enchantment DSP (SAB promotion)
Ink: Real Red
Accessories: Versamark, Black embossing powder, White embossing powder, snail adhesive, Stampin dimensionals


Supplies:

Stamp sets: Delicate Doilies, Tea Shoppe
Cardstock: Very Vanilla, Daffodil Delight, Basic Gray, Sahara Sand, Beyond the Garden DSP
Ink: Basic Black, Daffodil Delight
Accessories: Versamark, Black embossing powder, snail adhesive

Thanks so much for looking!

webbanner-002copy
Pin It

Acrylic Block Technique

At this weekend's card class of of the techniques I demonstrated was acrylic block stamping.  It's a great way to add texture and interest to your backgrounds in a project.  The method is just as it sounds.  Simply choose an ink color, load up your block, and stamp!  Below are a couple of examples and supplies of cards I've created with this super simple technique.

Supplies:


Stamp sets: Countryside, acrylic block E
Cardstock: Whisper White, Cherry Cobbler, Night of Navy, Baja Breeze
Ink: Basic Black, Baja Breeze
Write Markers: Real Red, Sahara Sand, Baja Breeze, Marina Mist, Not Quite Navy, Always Artichoke
Accessories: Versamark pad, clear emboss powder, snail adhesive

After stamping my background with Baja Breeze I loaded my stamp with Versamark first, then Basic Black ink; stamped the image, then clear embossed and heat set.  Doing this ensured that my Basic Black ink would not smear when I used my markers to color the image in.


Supplies:

Stamp sets: Bright Blossoms, Word Play, Acrylic block E
Cardstock: Whisper White, Summer Starfruit, Primrose Petals, Summer Smooches DSP
Ink: Basic Black, River Rock
Accessories: 2012-2014 In Colors Write markers, Sahara Sand Write marker, white gel pen, snail adhesive

This card not only showcases the acrylic block technique but also the 5 BRAND NEW In Colors; available June 1st!  I created the background with River Rock ink, then stamped the vases and blossoms by coloring the stamp with the In Color markers first.  I added shadows at the bottom of the vases with Sahara Sand and highlights on the vases and blossoms with the white gel pen.

Thanks so much for looking!


webbanner-002copy
Pin It

Friday, May 18, 2012

Gray Dawn

This morning when we awoke to the gloom of an overcast sky and rain, I decided I wanted to create what a sunrise would look like on a day like today; before the sun burned off the mist and the night.  For some reason I kept envisioning it in shades of gray so I just went with it...artistic license, right?  :)

Supplies:

Stamp sets: Christmas Lodge
Cardstock: Whisper White, Basic Black, Crumb Cake, Very Vanilla
Ink: Sahara Sand, Basic Gray, Basic Black
Accessories: Sponges, white gel pen, metallic brads, Snail adhesive

The process was fairly simple on this one.  I masked the sun and the horizon line with post it notes then began sponging with Sahara Sand; darker at the top of the sky and lightening as I moved towards the horizon line.  I followed the same process with the Basic Gray.  I added a little more Basic Gray along the horizon line to give it definition.  I then took my masks off and flipped them so I could work on the ground and the water.  I sponged Basic Gray and Basic Black on the ground area and Sahara Sand lightly through the water, finishing by adding the tree in the foreground and ripples in the water with my white gel pen.

Thanks so much for looking and have a great, safe long weekend!!


webbanner-002copy
Pin It

Wednesday, May 16, 2012

Beautiful Princess


I mentioned in a prior post that I have a love for punch art.  This is one of my most recent punch art projects...a Princess Dragon!  She's definitely whimsical - right from her Dazzling Diamond crown in her blond curls to her diamond necklace to her lovely red lips! LOL

Hope she gives you a giggle!

Supplies:

Stamp sets: Create a Cupcake, My Digital Studio: Elementary Elegance
Cardstock: Whisper White, Lucky Limenade, Calypso Coral, So Saffron, Basic Black, Island Indigo, Crumb Cake, Wisteria Wonder, Cherry Cobbler, Sweet Shop DSP
Ink: Melon Mambo, Island Indigo, Early Espresso, Wild Wasabi
Punches: Large oval, 1/2" circle, 3/4" circle, 2 1/2" circle, 1 3/8" square, 1 3/4" scallop circle, Trio flower (retired), scallop edge, eyelet border, Heart to Heart, modern label punch
Accessories: Background #1 Texturz plate, Basic Black marker, white gel pen, rhinestones, Versamark pad, clear embossing powder, Dazzling Diamonds, 2 way glue pen, Tombow multi-purpose liquid glue

Thanks so much for looking!

webbanner-002copy Pin It

Tuesday, May 15, 2012

Iris Fold Dress Form


This card uses a beautiful paper folding technique called Iris Folding, named after the way an iris of a camera lense looks.  Long pieces of thin paper (Stampin' Up! Designer Series papers work best) roughly 1" wide are folded in half then layed and glued following a numbered pattern.  I don't recommend using cardstock; it becomes too thick and bulky to work with.  There are tons of patterns to be found on the internet, along with some great tutorials.  Give this technique a try...once you do one you'll find they are highly addictive!

Supplies:

Stamp sets: Aviary, Tea Shoppe
Cardstock: Regal Rose, Tempting Turquoise, Early Espresso, Crumb Cake, Mocha Morning Specialty DSP
Ink: Basic Black, Crumb Cake
Accessories: Square Lattice Embossing folder, Sweet Stitches brads (retired), Snail adhesive, mini glue dots, Stampin dimensionals

Thanks so much for looking!

webbanner-002copy
Pin It

Monday, May 14, 2012

Doily Chandelier


This is another card I created using the Doily die in a different way; the die is a carry over item from the Occassions Mini Catalogue.  It will be available again in the new catalogue, coming June 1st. 

I really love how this card turned out...I can just envision it in someone's front Parlour in the Victorian era - what do you think??

Supplies:

Stamp sets: Just Believe
Cardstock: Whisper White, Lucky Limenade, Pool Party, Very Vanilla, So Saffron, Everyday Enchantment DSP
Ink: Basic Black, Crumb Cake
Accessories: Doily die, Background #1 Texturz Emboss, Build a Cupcake punch, Versamark pad, black embossing powder, Dazzling Diamonds, Stampin dimensionals, tombow multi purpose liquid glue

Here's a look again at what the doily looks like after you run it through the Big Shot.


When you punch out all those little pieces, don't throw them away...we'll be using a few of them to make the chandelier's crystals when were done.  Here's a diagram of the pieces you'll need to create the chandelier.


Once I had all my pieces cut out, I carefully press them into a Versamark pad then sprinkled with black emboss powder and heat set with my heat tool.  I completed this process for all pieces, except the 9 cut outs to be used for the crystals. Once the pieces were cool, I assembled them with Tombow glue and set aside to dry.  I then pressed the 9 cuts outs to be used for the crystals into Versamark and sprinkled them with Dazzling Diamonds.  The candlesticks were created using the candle portion of the Build a Cupcake punch - the base is Whisper White cardstock and the flames are So Saffron.  The ceiling chain was created with the circle portion of the Build a Cupcake punch as well.  I assembled the entire chandelier on Lucky Limenade cardstock that I had embossed with a Texturz plate.  Unfortunately, the picture doesn't show it that well.

The rest of the card assembly is fairly staightforward.  I used Very Vanilla as my card base, then layered Pool Party and Everyday Enchantment DSP on top.  On both layers I sponged the edges with Crumb Cake ink.  I completed the card by adding a few more small portions of the doily into the corners of the card and added my saying with the Just Believe stamp set and adhered with Stampin dimensionals. 

Thanks so much for looking!


webbanner-002copy
Pin It

Sunday, May 13, 2012

Happy Mother's Day Cascading Card


Happy Mother's Day to all the wonderful Mom's out there! 

This is the card I made for my Mom this year. I was trying to find a way to make it personal and then it hit me - photos of my sister and myself along with my two boys and my neice! Can't get much more personal than that LOL! I think it will be a special momento that can be left on display (hint hint Mom) :)

It's called a Cascading fold card.  It may seem a little complicated to figure out at first but once you have the measurements it comes together really quickly and becomes addictive simply because the possibilites for finishing a card like this are limitless!

I did quite a bit of searching to find a template for a card like this that was straight forward and easy to follow.  It came as no suprise that it was another Stampin' Up! Demonstrator that had the best tutorial!! Jan Farring posted a step by step guide found HERE with some great examples.

Supplies for my card:

Stamp sets: none
Cardstock: Summer Smooches DSP, Island Indigo, Calyspo Coral, Rich Razzleberry
Ink: none
Accessories: Embosslits Beautiful Wings, Bigz Dies Alphabet Simple Letters, modern label punch, 1 3/4" scallop circle punch, 1 1/4" circle punch, Everyday Enchantment brads (from Sale-A-Bration 2012), MDS, snail adhesive, mini glue dots

I made the flowers that the pictures are adhered to by punching out 3 modern labels and criss crossing them, then adding a punched 1 1/4" circle in the center.  I printed all the photos in My Digital Studio.

Hope you all had a wonderful Mother's Day weekend!  Thanks so much for looking!


webbanner-002copy
Pin It

Origami Dresses


Are these not THE cutest little dresses you've ever seen?  When I first seen them I knew right away it was the perfect card idea for my Mother-In-Law for Mother's Day.  I hope she likes them as much as I do! I found the tutorial on how to make them from a fellow Stampin' Up! demonstrator, Laura Pinto-Nguyen.  The link to her video tutorial can be found HERE.

Supplies:

Stamp set: Family Reunion
Cardstock: Whisper White, Crumb Cake, Tempting Turquoise, Melon Mambo, Beyond the Garden DSP, 2010-2011 Hostess paper pack (retired)
Ink: Basic Black
Accessories: Island Indigo baker's twine, mini clothespins, Eyelet border punch, snail adhesive, Stampin' dimensionals
Techniques: Origami folding

Thanks so much for looking!


webbanner-002copy Pin It

Friday, May 11, 2012

Grandma's Heirlooms

Do you see the young woman or the old woman? Hint: the young woman's chin is the old woman's nose

I love brain teasers.  Things that make me scratch my head and try to see things just a little differently. They can drive me CRAZY sometimes till I figure it out! 

I try to look at my stamping and paper crafting in much the same fashion.  You'll soon see in upcoming posts that I have a passion for punch art - I love assembling circles, squares, ovals, and hearts and creating something unique!

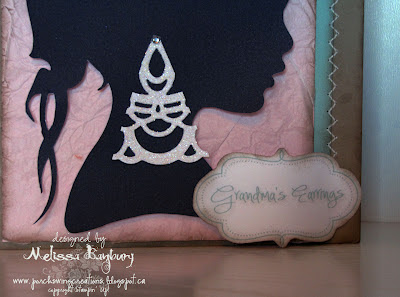
Today's cards use the Doily die for the Big Shot machine in a new way - to make jewlery!


Supplies:

Stamps: MDS Forever Young and Frames with a Flourish
Cardstock: Whisper White, Pool Party, Pretty in Pink, Crumb Cake
Ink: Crumb Cake
Accessories: Doily die, Background #1 Texturz plate, Dazzling Diamonds, Piercing tool and mat pack, white gel pen, rhinestones, scallop circle punch, Stampin dimensionals, Snail adhesive, glue stick, Tombow adhesive, white tissue paper
Technique: Faux Silk, Faux Stitching


Supplies:

Stamps: MDS Forever Young and Frames with a Flourish
Cardstock: Whisper White, Pool Party, Pretty in Pink, Crumb Cake
Ink: Crumb Cake
Accessories: Doily die, Background #1 Texturz plate, Dazzling Diamonds, Versamark, clear emboss powder, Piercing tool and mat pack, white gel pen, rhinestones, Build a Cupcake punch,  1/2" circle punch, Stampin dimensionals, Snail adhesive, glue stick, Tombow adhesive, white tissue paper
Technique: Faux Silk, Faux Stitching

To begin both cards I first went to My Digital Studio to print the silhouettes of the girl from the Forever Young digital stamp set.  I sized the images so 2 would fit on an 8 1/2" x 11" piece of Whisper White cardstock, printed them, and carefully cut them out.

Next I cut a doily out of white cardstock. Here is what the Doily die looks like when you initally cut it out with the Big Shot machine.

Now begins the "therapeutic" process.  You see all those little pieces? Well, they need to be punched out.  Its not all that bad; really.  A quick tip is to gently roll the doily around your piercing tool - many pieces will pop right out when you do this.  I've learned that playing around with the "sandwich" (ie: cutting plate, die, card stock, cutting plate, and cardstock shim) really helps too.  Each Big Shot machine is different so experiment is key.

Lets begin with the first card, Grandma's Earrings.  Here's a diagram of the piece of the die I used to create the earring.


After cutting out the piece I covered it entirely with 2-way glue and sprinkled on Dazzling Diamonds.  Once dry I adhered it to the silhouette with my 2 way glue pen and finished it off with a rhinestone on top of the earring. The flower in her hair was made by punching out a scalloped circle in Pool Party cardstock, then cutting a spiral into the circle.  Roll it up beginning from the outside inward and adhere with tombow adhesive.


In the second card, Grandma's Pearls, her hair bow is made with the piece of the die as pictured below

I cut 2 of the same pieces out, glued them on the silhouette to form the bow and added a rhinestone in the middle to finish it off.  Her pearl necklace was made by pressing a small piece of white cardstock in Versamark, covering in clear embossing powder, heat setting, then punching out the circles from the Build a Cupcake punch.  The bottom portion of her necklace is  a 1/2" circle in Pretty in Pink cut in half, layered and covered in Dazzling Diamonds. 

Assembly of both cards is the same with just a slightly different layout. 

I used the Faux Silk technique behind each silhouette.  It's a super simple technique.  Take a piece of white tissue paper slightly larger than your cardstock.  Crumple the tissue paper up, then smooth flat.  Adhere to your cardstock with glue stick and trim off any excess. Add completed silhouette's on top with dimensionals.

Both card bases use Crumb Cake cardstock, ran through the Big Shot and the Background #1 Texturz plate.  The raised part of the design was highlighted with Crumb Cake ink.  Before assembling the layers, I sponged all edges with Crumb Cake ink to add dimension then, after assembly, I used my piercing tool and white gel pen to add the Faux Stitching detail.  Finally I added the silhouettes and wording (created in MDS) with dimensionals.

Thanks so much for looking!


webbanner-002copy
Pin It
Related Posts Plugin for WordPress, Blogger...