Thursday, February 28, 2013

You're Sew Loved


I was scanning through some older photos and realized I hadn't posted this card that I made a few years back for my Mom for Mother's Day.  I recall seeing a card made like this in a magazine, but I can't remember which one it was! 

Supplies:

Stamp sets: none (sentiment was done in Microsoft Word and printed on Sahara Sand CS)
Cardstock: Sahara Sand, Elegant Soiree DSP (retired)
Ink: none
Accessories: Top Note die, thread holders, blue embroidery floss, Basic Black marker, Stampin dimensionals 

Before I sign off today I wanted to mention a couple of new features Stampin' Up! has released in the last couple of weeks.

"The Basics" Download Online Class
Now you can take a Stampin' Up! class in the comfort of your own home!  For $17.95 learn the best ways to get the most out of all your supplies, from stamps to Big Shot.  Tips and techniques are shared in this 6 section class - videos, steps outs, and supply lists for over 30+ projects!  Can't wait to check it out?  Simply click here to be re-directed to my online store to check it out!

Also brand new - HOSTESS CODES!
What is a Hostess code, you ask?  Well now when you host a workshop you can add online orders to your workshop orders.  This works wonderful for friends and family that can't make it to your workshop but still want to place an order; or those that want to add more to their order in a day or two.  The best news is that this code will now work with both My Digital Studio downloads and ALL items in the online store!  The process is simple, when your workshop begins I will give you a code that you yourself can use or that can be passed on to your guests.  When they place an online order they enter in the code at checkout and your automatically credited for those totals to go towards your Hostess Benefits.  Simple!

Well, I'm off to work on my next projects for U Stamp with Dawn & Friends!  This upcoming session is everything Big Shot.  I've already had a peek at what some of the other designers are up to and trust me, you don't want to miss this one!  Early bird pricing is available until March 14th for $19.95.  Sign up today - there's already a bonus project awaiting you....

Until next time!
webbanner-002copy Pin It

Tuesday, February 26, 2013

Spidey Cake

Hi All!

I may have mentioned a time or two that my oldest son is currently obsessed with Spiderman.  For mainly this reason I find myself designing in that direction when I have to make a card for a boy similar to his age.  Plus, its an excuse for punch art (which I myself might or might not have a mild obsession for).

I took inspiration for the cake shape on this card from a card designed by fellow SU! demonstrator, Sharon White.  If you aren't familiar with her work, you should definitely check her out!  Her punch art is outta this world!!

Supplies:

Stamp set: none
Cardstock: Real Red, Midnight Muse, Daffodil Delight, Basic Black, Neutrals Collection Designer Series Pack
Ink: none
Accessories: Honeycomb embossing folder, Naturally Serif (letters, retired), 1/2" circle punch, small oval punch, Scallop edge border punch, Basic Black marker, paper snips, dimensionals, tombow liquid adhesive, sticky strip

In hindsight (isn't there always a hindsight? LOL) I wish I had chosen a lighter card base so the cake would have really stood out.  The picture doesn't show the 3D aspect of this card very well either.  Each tier of the cake is actually raised off the base and each candle is a rolled piece of DSP glued behind each tier layer.  I wish I'd taken more pictures, but as usual I was in a hurry to put it in an envelope and get it attached to the gift!  Oh well, maybe I'll remember for next time!

Thanks so much for looking!
webbanner-002copy Pin It

Monday, February 25, 2013

More Amore His and Hers Slippers


Hi Everyone

Today I wanted to share my final project I created for this month's U Stamp with Dawn and Friends, Grow Creative Love.  Everyone knows how much time and effort goes into both planning and executing a wedding.  I think after everything is said and over you just want to put your feet up and relax with your new partner.  Pretty sure these comfy slippers are just the ticket to make that happen along with a bottle of wine and some chocolates!  Of course, you don't have to make these as a gift - I won't tell if you make a pair just to pamper YOURSELF! ;)

If you'd like a full step by step picture tutorial on how to create these slippers, belly band, card and envelope head on over to U Stamp with Dawn & Friends and download it today!

I'm currently working on 4 new projects for the next event titled Big Shot Roundup 2013 - projects that focus on ALL the Big Shot products from the current catalogues.  I can't wait to see what everyone comes up with; imagine all the inspiration at your fingertips all in one handy place!!

Until next time...
webbanner-002copy Pin It
Friday, February 22, 2013

"Calorie Free" Cupcakes!


Ah, Friday...wonderful Friday!

Just a quick post today to share my third of four projects I created for this month's U Stamp with Dawn & Friends, Grow Creative Love.  These are the best kind of cupcakes you could possibly have - NO CALORIES hahaha!

My initial intentions were to make these as a little Bridal Shower gift, but just think of the things you could do with this idea!  Baby Showers, Girls Spa Days, Birthday parties....literally endless possibilities!

If you'd like a full picture step by step tutorial on this project or countless wonderful others, click on the Grow Creative Love blinkie to the left to be re-directed to the site.  Special Guest Designer, Karen Burniston has shared a really lovely project with the Dress Form Pop 'n Cut dies.  If your not familiar with Karen, her pop up dies designs are world famous - she had designed many popular Sizzix pop up dies and I'm sure this cute Dress Form Pop 'n Cut will be no exception!  Head over to check her out!!

Have a great weekend everyone!  Until next time...
webbanner-002copy Pin It

Thursday, February 21, 2013

Here for Each Other


Yesterday felt like a mini vacation for me - my Mom and Dad took the boys overnight so I had an entire day to myself!  It was super exciting (for me anyway) because it meant no interruptions and a WHOLE DAY OF STAMPING!!

I managed to make 5 cards; a few for upcoming birthdays and other events and a couple extra's!  It sure feels good to know I'm a little ahead of the game so I won't be scrambling a day or two before the event.
This little card (and i do mean little - it's only 3 1/2" x 5" note card) was so quick to make.  Two stamps, one post-it note, and two colors are all you need to make a quick note for a friend.

Supplies:

Stamp sets: Christmas Lodge, Bloomin' Marvelous
Cardstock: Whisper White, Midnight Muse
Ink: Basic Black, Midnight Muse, Pretty in Pink
Accessories: Versamark, clear embossing powder, Stamp-a-ma-jig, sponges, Argyle embossing folder, Midnight Muse satin stitched ribbon, Stampin dimensionals

Begin by stamping the bird image in Basic Black ink on Whisper White cardstock.  Using a Stamp-a-ma-jig re-align the image slightly above the one already stamped (no more than a millimeter or so) and re-stamp your image using Versamark.  Apply clear embossing powder and heat set.  Now when the ink is applied it will appear as though the branch and birds have snow on them.  Tear a post it note and adhere it just below the branch.  Sponge Midnight Muse along the edge of the post it note, fading the color upwards.  Continue in this manner down the length of the cardstock.  For contrast add small amounts of Pretty in Pink to the sky and along the outer edge of the snowbanks.  Finish by adding the sentiment in the lower right portion of the cardstock with Midnight Muse ink.

That's all for today!  Until next time...
webbanner-002copy Pin It

Tuesday, February 19, 2013

A Lesson in Sepia with SU! Markers


Hi Everyone!

Hope you all had a lovely long weekend - it was Family Day here so everyone enjoyed an extra day off!  I've done a quick tutorial today demonstrating coloring in Sepia tones with Stampin' Up! markers.  It is essentially the same technique as marker layering, just in more neutral tones.  Hope you enjoy!

Supplies:

Stamp sets: Elements of Style, A Word for You
Cardstock: Whisper White, Pretty in Pink, Chocolate Chip
Ink: Black Staz-on, Chocolate Chip
Markers: Sahara Sand, Crumb Cake, River Rock, Soft Suede, Chocolate Chip, Blush Blossom
Accessories: Blender pen, Adorning Accents Edgelits, Designer Frames Folder, Oval Framelits, 1/2" circle punch, Square Lattice EF, Fancy Flower punch, Pearl Basic Jewels, Large oval punch, Tombow liquid adhesive

 Stamp image on Whisper White with Black Staz-on ink

Color entire image in with Sahara Sand marker

Along the edges of the petals and inside the flower add Crumb Cake and blend with a blender pen. 

Add River Rock along the same edges you added Crumb Cake and blend inward onto the petals.  You can begin to see the shadow and depth forming.

Next, add Soft Suede in MINIMAL amounts just in the center of the flower and blend outwards.  Too much color and your shading is ruined!

 Final step is to add Chocolate Chip marker.  In this instance, I only used small dots of color in the center and bottoms of petals then blended.  Continue like this for each flower, leaf, and stem.

As a finishing touch:
After cutting out to sit in the center of the Designer Frame Oval, color in the white space with a Blush Blossom marker.  Work in smooth even strokes to not create lines.  Then go back with the same marker and outline each flower and leaf to make them really stand out on the page.

Hope you give this Sepia technique a try!  It really adds a vintage look to your projects!

Until next time...
webbanner-002copy Pin It

Friday, February 15, 2013

Elements in Sepia


Hello!

Late post today...I was building Lego for a good portion of the day and took a small break to do a little stamping :)

I've always been drawn to the look of sepia and black and white; whether in photographs or in stamping.  I stamped a scene I called Gray Dawn a while back and truly enjoyed it.  It's quite a challenge to create shade and highlights with so little color; but its a challenge that can be easily met with a little practice.

Supplies:

Stamp sets: Elements of Style, Bloomin' Marvelous
Cardstock: Whisper White, Chocolate Chip
Ink: Black Staz-On, Chocolate Chip
Accessories: Markers, blender pen, Lace Brocade EF, Large Rhinestones, Labels Collection Framelits, Large oval punch, Tombow adhesive

I'm working on a tutorial for this Sepia technique along with a double embossing technique that I used on this card which I will (hopefully) share with you on Monday.  Until then have a wonderful weekend!!

webbanner-002copy Pin It

Thursday, February 14, 2013

I Dig You Valentine's


Happy Valentines Day!

I've already shared with you the V-Day card I made for my hubby HERE so today I wanted to share the ones I made for my boys.  Man oh man (no pun intended hehehe), its hard to make V-Day cards for men and boys without using tons of red and pink!  Funny thing is, is when I compare these two and the one I made for my husband, I used identical colors and materials!  Talk about a stuck in a rut moment!  Let's just say I planned it that way - ya, that's right - I planned them to be match!

Supplies:

Stamp set: I Dig You
Cardstock: Island Indigo, Whisper White, Early Espresso Core'dinations, Pink Pirouette, Primrose Petals, Summer Smooches DSP
Ink: Basic Black
Accessories: markers, Heart to Heart punch (retired), Cupcake Builder punch, Tombow adhesive, paper snips, Texturz Plate (retired)

This morning, my oldest and I decided it might be a good idea to make Valentine cookies.  So we got to work and made a couple batches of pink heart sugar cookies.  Let's just say they're a hit! The container is dwindling faster than it took us to make them...but in the words of my father "They are always better fresh, don't ya know"....
Have a wonderful day!  Until next time...
webbanner-002copy Pin It

Wednesday, February 13, 2013

Night Flutter Marker Layering Tutorial


Hi Everyone

I had some wonderful comments on my first post that featured this butterfly, A Quick Hello.  A few asked if I might do a quick tutorial on marker layering, so here it is!

I didn't think I'd get this done as quickly as I did but when I received the message last night that my Uncle was undergoing emergency surgery for an aneurysm I couldn't sleep.  Working on something like this seemed the best solution to keep myself together; for the moment anyway.

When I first seen this Swallowtail image, I could only visualize it in motion.  I knew if I was going to use it, it would have to look as though it was fluttering off the card.  My first card had dimension but this card has REAL DIMENSION!  Follow along to bring your Swallowtail to life...


Supplies:

Stamp sets: Swallowtail, Bloomin' Marveleous (Sale-a-bration 2013)
Cardstock: Whisper White, Marina Mist, Primrose Petals
Ink: Versamark, Baja Breeze, Not Quite Navy, Midnight Muse, Basic Black
Markers: Basic Black, Pink Pirouette, Pretty in Pink, Regal Rose, Primrose Petals, Raspberry Ripple, Calypso Coral, Cajun Craze
Accessories: Black embossing powder, blender pen, brayer, 1 1/4" circle punch, Honeycomb embossing folder, sponges, snail, mini glue dots, dimensionals, Tombow, paper snips

Stamp two Swallowtail images onto Whisper White cardstock using Versamark ink.  Sprinkle with Black embossing powder and heat set.

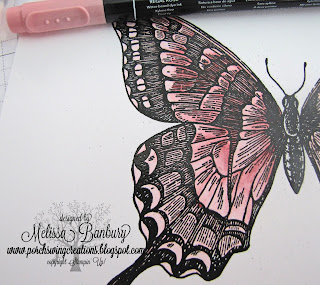
Color in the entire image using a Pink Pirouette marker.

Add Pretty in Pink from the center of the butterfly, blending outward with a blender pen.  SLOWLY add color, leaving the outer most edges untouched.  The color should look as though its fading away.

Continue in the same manner with Regal Rose, only adding color to the center of the butterfly and blending outward.  The other colors should still be visible to achieve the blended look we are going for.

Add Primrose Petals on top of the Regal Rose - a SMALL dot of color will do.  The more pigmentation in the markers the more easily they blend into one another.

A small amount of Raspberry Ripple added on top really adds depth and dimension to the inside of the butterfly.

For a little visual interest, add Calypso Coral onto the outside tips of the wings and blend well.

Color in the butterflies body with a Cajun Craze marker.

With a white gel pen, highlight areas of the butterfly with small dots.  Adding them to the darkest areas really helps accentuates the wings.


Cut out both butterflies carefully with paper snips.  Using Tombow adhesive glue the two pieces, wrong sides together.  You've now created a three dimensional butterfly!

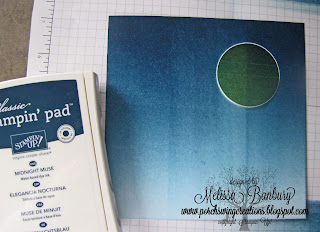
Cut a sheet of Whisper White cardstock 5 1/2" x 5 1/2".  Punch a 1 1/4" circle from a post it note and apply to the cardstock to create a mask for the moon.  Brayer Baja Breeze over the entire cardstock.

Brayer Not Quite Navy over top of the Baja Breeze, approximately 2/3 down the cardstock.

Brayer Midnight Muse 1/3 of the way down from the top of the cardstock.

Remove mask and sponge Baja Breeze onto the moon.

With a Basic Black marker, draw grassline along the bottom of the cardstock.

Add sentiment in Basic Black ink to the upper left hand side of the cardstock.

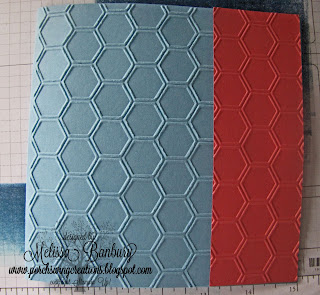
Cut a piece of Marina Mist cardstock 6" x 12", score in half.  Cut a piece of Primrose Petals cardstock 2"x6".  Run both pieces through the Big Shot using the Honeycomb embossing folder.  Adhere together with Snail.  Glue the brayered background cardstock to the card front with Dimensionals.


Lightly fold the butterfly upwards on either side of the body.  Add small glue dots to hold the center of the wings together to help put it into 'fluttering' motion.  Add a dimensional to the underside of the body and glue to the grass on the card front.

Hope you find this tutorial helpful.  The biggest thing to remember when marker layering is practice, practice, practice!  The more you do the more confident you'll feel!  Also keep in mind that when your choosing your color scheme, always work your lightest color to your darkest and you'll have amazing results!

I'd love to hear your thoughts and comments, so please leave them below this post!!

Until next time...
webbanner-002copy Pin It

Tuesday, February 12, 2013

Feeling Sentimental Luggage Box Set


Happy Tuesday!

Just a quick post today to share another project I created for this month's U Stamp With Dawn & Friends.  I created this vintage suitcase to hold all 6 cards that are featured in the photo, plus a notepad, and a place for pen storage.  This project suite is definitely 'all in the details' and would make a wonderful keepsake holder!

Hope you can stop by U Stamp with Dawn and check it out.  Just click on the Grow Creative Love blinky to the left to be re-directed to her site.  There you will find a new project posted every 12 hours or so along with fabulous photos and tutorials on each project!  I still have two more projects to share with you that I created for this event, so stay tuned!

Have a wonderful day!  Until next time...
webbanner-002copy Pin It
Related Posts Plugin for WordPress, Blogger...