Friday, June 27, 2014

Canadian Wheat Field Sunset


Happy Friday!

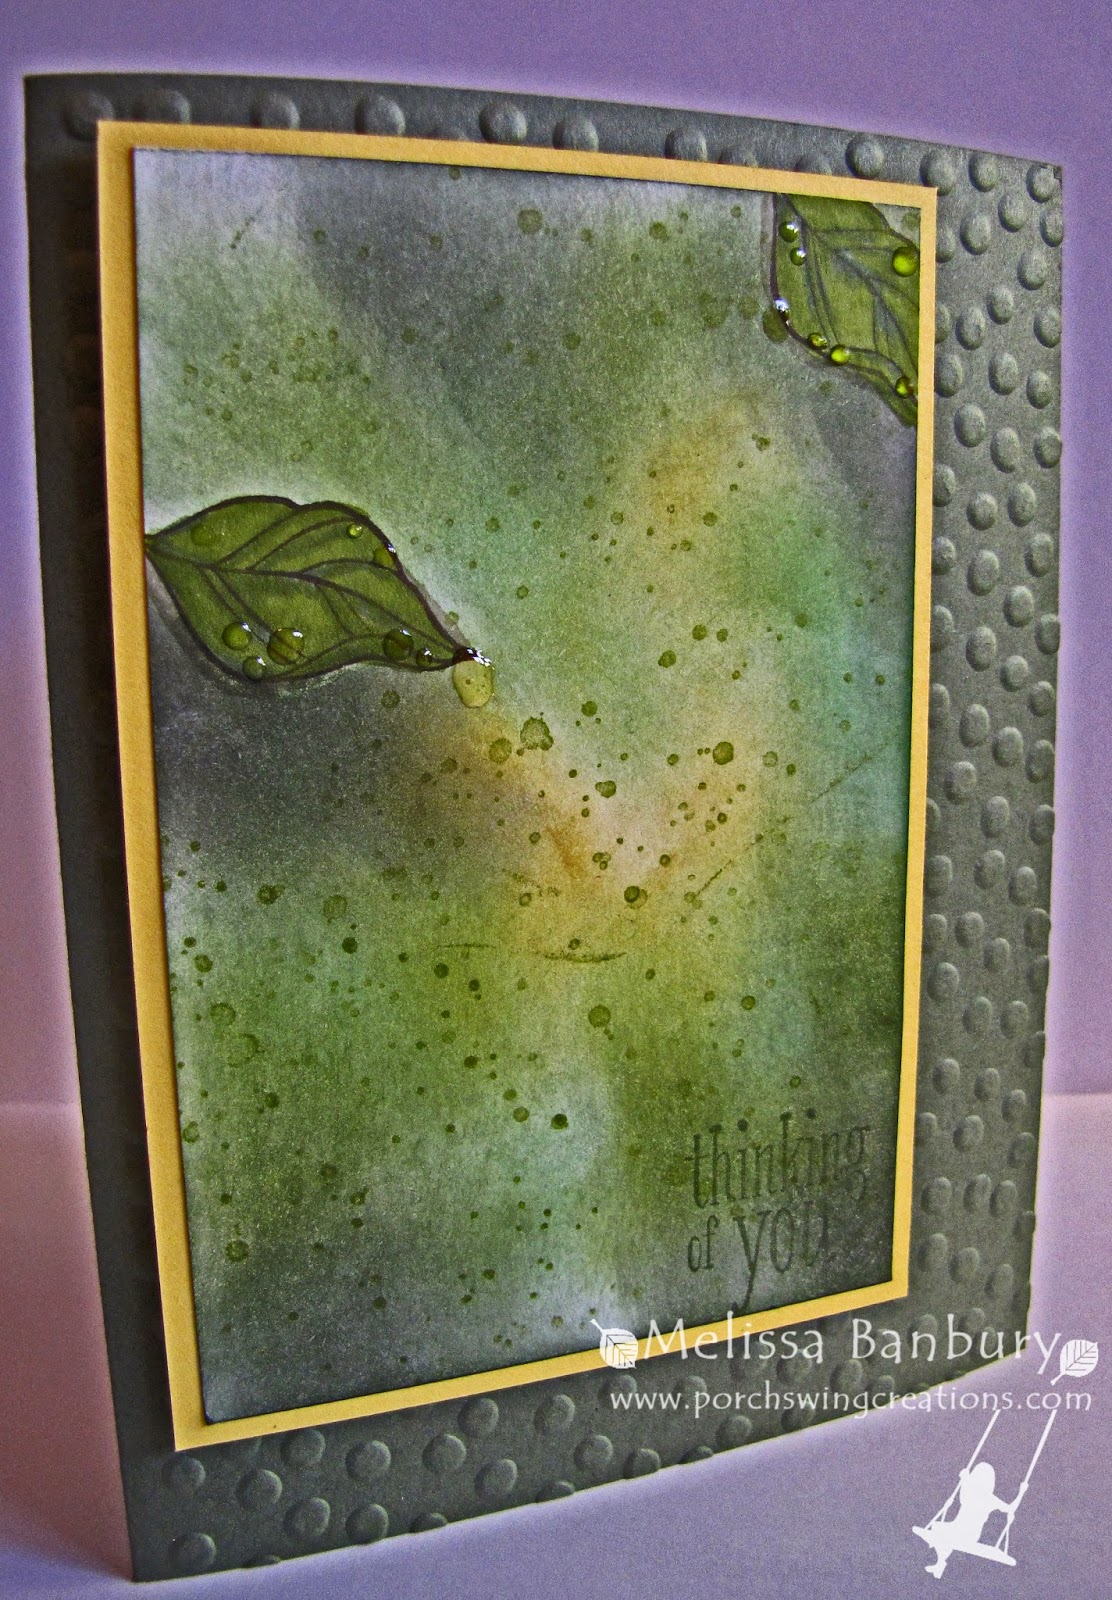
I still have a couple of Father's Day cards to share with you that I didn't manage to squeeze into my posts last week.  The great thing about a masculine card like this is that it doesn't have to be just labelled as "Father's Day" because this would still make a great card for ANY masculine occasion!  I left it free of embellishments simply because I thought the leaf was embellishment enough - but it could be easily and quickly stepped up with a button or brad.

Supplies:

Stamp sets: Wetlands, Delightful Dozen
Cardstock: Whisper White, Baked Brown Sugar
Ink: Crushed Curry, Hello Honey, Tangerine Tango, Cajun Craze, Baked Brown Sugar, Basic Black
Accessories: Autumn Accents Die, 1" Circle Punch, Square Lattice embossing folder, Stampin' Dimensionals, sponges, Sticky Note (for masking)

Here's a quick tutorial if your interested in making a card similar to this one:

Begin with a piece of Whisper White cardstock slightly smaller than the card base.  Mask off the bottom third of the cardstock with a sticky note.  Sponge the sky using a "smearing" motion in the following order: Crushed Curry, Hello Honey, and Baked Brown Sugar.  Flip the sticky note around to cover the sky and sponge the field using the same "smearing" motion in the following order: Tangerine Tango, Cajun Craze, and Baked Brown Sugar.  Remove the mask and stamp the grass image from the Wetlands set randomly across the field section in Basic Black.

To create the leaf first cut out the Maple Leaf portion of the Autumn Accents die from a Sticky Note. Discard the inside portion; we'll be using the negative portion as a stencil.  Lay the stencil onto a piece of Whisper White cardstock.  Mask off the bottom third of the leaf with another sticky note, just as you did in the background step.  Punch a 1" circle from yet another sticky note and place approximately half of the circle over the horizon line mask.  Sponge the sky as you did in the background step.  Flip the mask over and sponge the field as in the background step.  Lightly sponge the sun with Crushed Curry so it isn't stark white.  Stamp the grass image across the bottom in Basic Black.  Remove the stencil and with paper snips cut a small border around your stenciled image.  Line up the images together and adhere with Stampin' Dimensionals.

Hope this card has inspired you to get your fingers inky during the weekend!  It's Canada Day here on Tuesday and I'm crossing my fingers for no rain so we can enjoy the day and get a few outdoor projects finished.  If not I suppose I will just have to hide away in my card room creating ;)

See you back here next week!
 photo d6fad301-7d1b-423d-a2b6-c4c19f15fe5e.jpg
Pin It

Wednesday, June 25, 2014

Blackberry Moonlight


Good Day!

Well, after yesterday's fiasco with my email being hacked I think I'm back on track today and ready to share a new card design with you!

Usually when I get the new annual catalogue I do a quick flip through and make a mental list of my MUST have stamps.  The World of Dreams set topped the list this year!  I just love those little birdies in their nest :)
I'm sure many people have visions of these little birds against a bright blue sky in a leafy green tree but for some reason I envisioned them within a night scene; maybe I'll attempt a daylight version for my next project using the set.

And, just as in my last card I shared I used one of the new In Colors, Blackberry Bliss.  I'd be fibbing if I said this color appealed to me at first but once again Stampin' Up! hit the nail on the head yet again!  This color is simply gorgeous when put to paper!  I see many a sunset being made incorporating this color in my near future ;)

Supplies:

Stamp sets: World of Dreams
Cardstock: Whisper White, Coastal Cabana, Blackberry Bliss
Ink: Basic Black, Wisteria Wonder, Perfect Plum, Blackberry Bliss
Accessories: 1 3/4" Circle Punch, Sponges, Tombow, Sticky Note (for masking)

Hope you enjoyed this share today!  I'm off to work outside; the forecast warns of another five days of rain and if I don't make an attempt in my garden today I'm going to be left with a jungle!  

Until next time...
 photo d6fad301-7d1b-423d-a2b6-c4c19f15fe5e.jpg
Pin It

Tuesday, June 24, 2014

Email Account Update...

Morning All!

I'd like to say its a good morning but I awoke to find that my email account had been hacked this morning. I have worked all morning to solve the problem; changing passwords and security measures, and hope I've taken care of it.  Thank you to those that let me know I had an issue - because of that I was able to act quickly!

I apologize for any ridiculous emails you may have received claiming to be me - I'm not stuck in a foreign country, nor do I need financial assistance.  It never ceases to amaze me how much effort people can put into ruining someone else's day but it does bring in the realization that it's so VERY important to be safe online!

Again, I truly apologize.  I'll be back tomorrow with a new card share, spam free!  :)
 photo d6fad301-7d1b-423d-a2b6-c4c19f15fe5e.jpg
Pin It

Monday, June 23, 2014

Moonlight Sparkle


Welcome to another week! 

I hope its dry wherever you are, because around these parts we've had so much rain that I'm sure Noah's on his way with his Arc!  It's supposed to turn around this week according to the forecast - I'm crossing my fingers that that's the case because I have an outdoor projects I want to share with you soon!

I've finally been able to find the time to dig into the new stamps and In Colors from this years catalogue and I must say although I wasn't in love with the new colors at first, I've fallen hook line and sinker after using them!  Lost Lagoon has to be at the top of my list at the moment - the depth of this color is AMAZING and makes for a perfect backdrop for a dusk/night scene.  And the perfect pair to a dusky night sky? Why, a little sparkle of course!  I LOVE how these butterflies turned out.  Subtle shading with sponges along with Dazzling Diamonds and they look so real they could fly right off the card!

Supplies: 

Stamp sets: Papillion Potpourri, Summer Silhouettes, Wetlands, Best of Love (retired)
Cardstock: Whisper White, Chocolate Chip, Lost Lagoon
Ink: Chocolate Chip, Soft Sky, Lost Lagoon, Mossy Meadow
Accessories: Label Bracket Punch, Honeycomb Embossing Folder, Dazzling Diamonds (retired), Victorian Lace Trim Ribbon (retired), Stylus, Foam Mat, 2 Way Glue Pen, Sticky Strip, Stampin' Dimensionals, Sponges, Multi-purpose liquid glue, paper snips

To create the butterflies:
Stamp one of the images from the Papillion Potpourri set onto Whisper White cardstock with Chocolate Chip ink.  With an almost dry sponge lightly ink the interior of the butterflies with Mossy Meadow.  Sponge the tips of the wings with Lost Lagoon, blending with the Mossy Meadow in the center of the butterfly and focusing the darkest part of the color on the most outer edges of the wings.  Finish up with Chocolate Chip ink around the entire outer edge of each butterfly to add shading.  Cut out with paper snips and add dimension with either a stylus tool or bone folder.  Cover each butterfly with 2 Way Glue Pen glue and sprinkle generously with Dazzling Diamonds or Stampin' Glitter in Dazzling Diamonds. Let fully dry before adhering to your project.

To create the background:
Begin with a piece of Whisper White cardstock.  Sponge Soft Sky over the entire piece of cardstock.  With Lost Lagoon ink begin sponging along the outer edges blending inward so that the center of the cardstock remains the brightest point.  Stamp the background flowers (in this case the base of Queen's Anne Lace from the Summer Silhouettes set) in Soft Sky ink along the bottom of the cardstock and up along the sides as well. Choose a foreground flower (in this case the grass from the Wetlands set) and begin stamping randomly over the background flowers.  Stamp a couple of times without re-inking the stamp to help add depth and shading.  "Perch" the butterflies onto the flowers using Stampin' Dimensionals.

I hope you have a wonderful rest of your day!  I'll be back in a day or so with another share so be sure to check back :)
 photo d6fad301-7d1b-423d-a2b6-c4c19f15fe5e.jpg
Pin It

Friday, June 20, 2014

Teacher Appreciation Apple Card

Happy Friday!

My son finished his Pre-Kindergarten year on Wednesday so were officially on summer break!  He so enjoyed this year learning and playing with new friends and is really looking forward to the Fall when he heads into Kindergarten.  

We needed a couple of teacher cards/gifts as end of year Thank You's so I headed over to Pinterest for a few ideas and inspiration.  This cute apple card is pretty much a direct case of one I found while browsing; I just modified it a little with the supplies that I had on hand.  After assembling the apple I added small tabs to the inside of the card to hold a Gift Card and it was all set for giving.  I'll be sharing the gift I created to go along with the card sometime next week :)

Supplies:

Stamp sets: Itty Bitty Banners
Cardstock: Real Red, Whisper White, Basic Black, Chocolate Chip, Gumball Green (retired)
Ink: Basic Black
Accessories: Heart Framelits, Flower Frenzy Bigz Die, Bird Builder Punch, Decorative Dots EF, Square Lattice EF, Vintage Fauceted Buttons, Cherry Cobbler Baker's Twine, Multi-purpose liquid glue

I used the Heart Framelits as a "template" of sorts for the card shape.  I wanted the apple to be able to hold a gift card but unfortunately that required using the largest heart shape in the set and I didn't want my apple to have a scalloped edge.  I ended up tracing the heart onto my card front instead of running it through the Big Shot.  To create the shape of the card front follow these steps: 
  1. Start with a standard size card in Real Red measuring 4 1/4" x 11", folded in half
  2. Lay the largest Heart Framelit (scalloped) onto the card front, with the upper portion of the heart slightly overhanging the fold in the card.
  3. With a pencil lightly trace around the heart
  4. Use a pair of paper snips to cut out the heart shape.  Erase any remaining lines.
  5. To create the bottom nubs of the apple take one of the smaller Heart Framelits and transfer the upper portion of the shape to the bottom of the apple with a pencil.  Cut out with paper snips. (You can also freehand this step if your comfortable with that)
  6. The inside of the apple was made with the second largest Heart Framelit and Whisper White cardstock.  Cut the heart in half, round out the bottom edge and emboss with the Square Lattice Embossing Folder.
The apples seeds are made with the wing portion of the Bird Builder punch in Basic Black, the leaves are from the NEW Flower Frenzy Die in Gumball Green then embossed with the Decorative Dots embossing folder, and the stem was freehand cut from Chocolate Chip.

Hope this might help you out with those last minute card ideas!  I have lots more to share with you next week, along with a much requested recipe for the Hummingbird Anniversary card I shared a couple days ago.  

Have a wonderful weekend, and if you happen to be in my neck of the woods, try to stay dry!!

 photo d6fad301-7d1b-423d-a2b6-c4c19f15fe5e.jpg
Pin It

Wednesday, June 18, 2014

Hummingbird Anniversary


Hello!

My parents celebrated their 36th Anniversary yesterday and I was "commissioned" by my Dad to make a card from him to my Mom.  She loves Hummingbirds, I love punch art, and my Dad loves that he doesn't have to go card shopping...so I think this card ended up as a win win for all those involved ;)

Believe it or not, being the punch art junkie that I am, I've only had the Bird Builder punch in my collection for a couple of months.  I don't know why I waited so long to purchase it - the possibilities are so beyond just a bird!  I find myself reaching for it quite often now, especially for that little branch and leaves - they can add the perfect finishing touch to not only a card front but 3-D projects as well when you give them a little "lift" with a stylus tool!

Supplies:

Stamps: Happy Watercolor (retired)
Cardstock: Coastal Cabana, Whisper White, Gumball Green (retired), Real Red, Basic Black, Wild Wasabi DSP
Ink: Garden Green, Cherry Cobbler, Coastal Cabana
Punches: Bird Builder, Owl, Boho Blossoms
Accessories: Oval Framelits, Woodgrain EF, Whisper White Ribbon, Stylus, Foam Mat, Sponges, Multi-purpose liquid glue, Stampin' Dimensionals

Thanks for stopping by today!  Until next time...

 photo d6fad301-7d1b-423d-a2b6-c4c19f15fe5e.jpg
Pin It

Monday, June 16, 2014

Perfect Catch!


Hello!

Welcome to another Monday!  I have a quite a few cards to share over the next few days - I had three Father's Day cards to make, three Anniversary cards, plus end of year school gifts for kids AND teachers. Whew, I've been busy (and I'd like it no other way when it comes to stamping and creating!)

The card I'm sharing with you today is the one I made for my hubby for Father's Day.  As our boys are getting a little older he's finding more and more enjoyment in taking them fishing and one day hopes to take them hunting.  It's seemed only fitting to give him a card depicting one or the other so when I found a link on Pinterest for this Bass punch art I knew it would be perfect for him!  

I had to change a thing or two when I made my version simply because the colors she used are no longer current, as is one of the punches.  I ended up using Whisper White cardstock and sponging the colors I wanted instead of using colored cardstock to start out. It takes a little more time, but I'm happy with the way it turned out - sponging always makes me feel more in control of the end result ;)

Supplies:

Stamp sets: Lovely as a Tree, Wetlands, Gorgeous Grunge
Cardstock: Whisper White, Cajun Craze, Mossy Meadow
Ink: Soft Sky, Coastal Cabana, Lost Lagoon, Crumb Cake, Mossy Meadow, Pistachio Pudding, Calypso Coral, Cajun Craze
Punches: Extra Large Oval, Large Oval, Small Oval
Accessories: Stamp a ma jig, Decorative Dots EF, Basic Black markers, White Gel Pen, Sponges, Craft Feather, Mutli-Purpose Liquid Glue, Stampin' Dimensionals

To create the background first mask off the waterline with a sticky note on a piece of Whisper White cardstock.  Sponge Soft Sky around the outer edges of the cardstock leaving the center much lighter.  Flip the sticky note over and begin sponging the water with a combination of Coastal Cabana and Lost Lagoon for contrast.  To create the treeline place the mask back over top of the waterline then sponge small amounts of Crumb Cake to make banks for the trees to be stamped on.  Once the banks are sponged, stamp a couple of trees from the treeline in the Lovely as a Tree set.  Finish up by stamping the grass image from the Wetlands set across the bottom of the waterline a few times in Mossy Meadow ink.  Add the dots from the Gorgeous Grunge set in Soft Sky ink around the areas where the Bass will be positioned to create the look of splashing water.

As for making the Bass first punch then assemble the pieces for the body out of Whisper White cardstock with Multi-purpose glue.  This will make it much easier to trim, sponge and do the shading when the fish is whole rather than sponging each individual piece before assembling.  Sponge Pistachio Pudding first, blending inward to the belly of the fish.  Shade with Mossy Meadow over the Pistachio Pudding.  Lightly shade the belly area with Calypso Coral ink.

Punch out and shape the fins then sponge with a combo of Calypso Coral and Cajun Craze ink before gluing to the body of the fish.  The eye is a dot of white gel pen with a smaller dot of Basic Black marker.  Glue the Bass to the background using dimensionals, being sure to center over the water droplets created in the background step.  Add a few additional water ripples and splashes with a white gel pen underneath and around the fish.

As a final touch draw a fishing line from the fish's mouth with a Basic Black marker and glue a craft feather in the mouth to mimic a fish hook.

Hope you enjoyed this card!  I'll be back with more so be sure to check back - have a wonderful day!
 photo d6fad301-7d1b-423d-a2b6-c4c19f15fe5e.jpg
Pin It

Tuesday, June 10, 2014

Forget-Me-Knots Vintage Scooter


Hello!

Here's my latest creation, a Vintage inspired Scooter - finally out of my imagination onto paper!  This one has been in the works for awhile but I just couldn't seem to get it to come out the way I'd imagined.  I kept at it and am now really happy with the results.  I knew it was just right when my 4 year old noticed it sitting on the shelf yesterday morning and said "Mom! You made a SCOOTER!"

I think my favorite part of the piece is the old, rusty pail full of Forget-Me-Knots though.  It turned out so sweet; the extra effort for the little flowers was well worth it; the blue of the flowers really pops against the orange of the pail and scooter. 

The finished size of the scooter is approximately 6" high x 6" long - a perfect size to add to a summer time display or on a shelf all by itself.  I think it would make a great gift too - perhaps for an extra special teacher at the end of the school year?  Or how about as a small centerpiece at a Vintage themed wedding?  I love that something like this can fit into pretty much any decor!

Supplies:

Stamp sets: N/A
Cardstock: Whisper White, Smoky Slate, Hello Honey
Ink: Baked Brown Sugar, Cajun Craze, Pacific Point
Accessories: Linen Thread
Markers: Basic Black, Early Espresso
Big Shot: Circle Framelits
Punches: 1 ¼” Circle, Cupcake Builder, Flower from the Itty Bitty Accents Trio
Misc. : Multipurpose Liquid Glue, Hot Glue Gun, Sticky Strip, Stampin’ Dimensionals, paper snips, sponge daubers, foam mat, Stylus Tool, White Gel Pen, Bone Folder, Piercing Tool, Spanish Moss (optional)

If you are interested in making one of these for yourself or as a special gift, please visit my Online Tutorial Store to purchase your own PDF tutorial.  You'll get a template, detailed instructions, and tons of tips for creating this sweet project!

** As always please keep in mind that I DO NOT subscribe to an automatic email service, so it may take a few minutes for the tutorial to arrive into your inbox.  I promise to have all tutorials sent within 24 hours of purchase**  Thank you in advance for your patience!


I'll be back in a day or two with some more projects I'm working on for Father's Day and end of school year gifts.  Be sure to subscribe to the blog so that any updates are sent to your inbox automatically :)  

Until then, have fun creating!!

 photo d6fad301-7d1b-423d-a2b6-c4c19f15fe5e.jpg
Pin It

Friday, June 6, 2014

I Have My Eyes on You!


Happy Friday!

I had full intentions of sharing a brand new tutorial with you today but regular scheduled life got in my way of crafting...AGAIN!  I'm not quite finished and want it to be perfect before I share so here's crossing my fingers for Monday...

Luckily I haven't shared this card with you all yet so we won't end the week empty handed!  This card is totally ridiculous, goofy, and crazy - exactly like the person I made it for LOL!  A close friend celebrated a milestone birthday last week and we attended a surprise birthday party in her honor over the weekend.  She owns two adorable Chihuahua's so it was an obvious choice to include them into my card.  I searched online for a little inspiration and decided to go over the top - did I succeed??  

The camera didn't pick it up unfortunately, but I did cover his eyes and the frosting of the cupcake in Crystal Effects so that they would shine when the light hit them.  Before the Crystal Effects on the Cupcake was dry I sprinkled a little Dazzling Diamonds on top.  This is a great technique to use because the glitter will never rub off!

Supplies:

Stamp sets: N/A
Cardstock: Whisper White, Coastal Cabana, Tempting Turquoise, Pink Pirouette, Basic Black, Old Olive, Daffodil Delight, Wisteria Wonder, Pistachio Pudding, Subltes DSP Pack
Ink: Baked Brown Sugar, Early Espresso, Blushing Bride
Punches: Pennant, Build a Cupcake, 1 1/4" Circle, 1 3/4" Circle, 1" Circle, Owl Builder, Window, Extra Large Oval, Large Oval, Boho Blossoms, Modern Label
Accessories: Sponges, Crystal Effects, Dazzling Diamonds, Decorative Dots embossing folder, White Gel Pen, Multi-purpose liquid glue, Stampin' Dimensionals

Hope this card added a smile to your start of the weekend!  I'll see you all back here next week!
 photo d6fad301-7d1b-423d-a2b6-c4c19f15fe5e.jpg
Pin It

Wednesday, June 4, 2014

By the Sea Faux Canvas


Good Morning!

I have another card from my Techniques class featuring Crystal Effects to share with you today.  It's a technique called Faux Canvas; its really simple to create and turns a smooth piece of Whisper White cardstock into the look of a piece of artist's canvas.  You'll look like an instant accomplished artist in just a couple steps!

Supplies:

Stamps: Wetlands
Cardstock: Whisper White, Coastal Cabana, Baked Brown Sugar, Basic Gray, Brushed Gold
Ink: Pool Party, Coastal Cabana, Marina Mist, Basic Gray
Punches: Extra Large Oval, Itty Bitty Accents, Banner
Accessories: Linen Thread, Piercing Tool, Piercing Mat, Circle Framelits, Argyle embossing folder, sponges, Basic Gray marker, Crystal Effects, Multi-purpose liquid glue, Stampin' Dimensionals, old toothbrush

Begin with a piece of Whisper White cardstock.  In this case, I cut one of the larger circles from the Circle Framelits.  Sponge Pool Party over the entire piece of cardstock.  Next sponge Coastal Cabana, focusing the color more along the bottom to create a waterline and along the very outer edges for depth.  Finish by sponging with Marina Mist along the outer edges.  Stamp the birds from the Wetlands set in Basic Gray along the waterline you sponged earlier.  Add a few additional birds to the sky area with the fine tip of a Basic Gray marker.
Now for the fun part - creating the Faux Canvas.  Add a dollop of Crystal Effects directly onto the center of your finished image.  With an old toothbrush spread the Crystal Effects working ONE way (ie vertically) across the image and entire piece of cardstock.  While the first layer is still wet, apply another dollop of Crystal Effects and work the OPPOSITE way of the way you just completed (ie horizontally).  You'll end up with this wonderful criss cross effect that looks just like canvas!  Set the cardstock aside to dry fully before apply to your card front. There is a good chance the cardstock will want to curl upwards - this is perfectly fine - it will lay flat again once it fully dries.

I'm off to get working on a new tutorial that I hope to have available by the end of the week.  Its currently pouring rain outside so I can work on my paper flowers inside instead of the real ones outside guilt free!  I hope you have a wonderful day!  Until next time...
 photo d6fad301-7d1b-423d-a2b6-c4c19f15fe5e.jpg
Pin It

Monday, June 2, 2014

Morning Dew


Good Day!

The last two days we've woken up to mornings that look much like this card...rainy and slightly subdued. Somehow, though, the light is fantastic - it makes the green leaves of my plants darker and richer and pop against the wet black soil in my garden.  Perfect for picture taking!

Anyhow, back to my card.  I'd decided to demonstrate Crystal Effects this month at my card class in a couple of different ways not knowing that this card would reflect the outdoors at the time so perfectly!  After sponging and stamping I used small dots of Crystal Effects on the leaves to mimic the look of morning dew. It turned out so pretty and its a nice way to add a little dimension to your card front without the use of heavy or thick embellishments (which is great for mailing!)

Supplies:

Stamp sets: Peaceful Petals (retired), Gorgeous Grunge
Cardstock: Whisper White, Daffodil Delight, Always Artichoke
Ink: Hello Honey, Pear Pizzaz, Old Olive, Always Artichoke, Early Espresso, Basic Black
Accessories: Decorative Dots embossing folder, Sponges, Crystal Effects, Pear Pizzaz, Old Olive, Always Artichoke markers, Multi-purpose Liquid adhesive, Stampin' Dimensionals

If you are interested in how I did the background sponging here's a quick overview:
Stamp the leaf images with Early Espresso ink.  Stamp them again on a sticky note, cut them out and lay them over top of the initial images to create a mask.  Sponge Hello Honey onto the center of the cardstock, then Pear Pizazz along the edges of the Hello Honey spreading outward.  Next, sponge a mixture of Old Olive and Always Artichoke, blending from the edges of the Pear Pizzaz to the outer edges of the cardstock. Add a small amount of Basic Black beneath each leaf to add shadow.  Finish off by stamping the small dots image from the Gorgeous Grunge set over the entire piece with Always Artichoke ink.  Remove the masks, color the leaf images with markers and add small dots of Crystal Effects to each leaf.

I've had a tiny chance to get to sit down and use a few of the new In Colors that came out in the catalogue released today and I'm loving them!  I used Hello Honey on this card and love the richness of the color - I can't wait to get creating with them all!  If you haven't had a chance to look at the new catalogue yet, I'll be posting a link in the left sidebar or you can go to the Stampin' Up! website to check it out.  There are some amazing new products that I'm sure will have you inspired to create with!

Until next time...
 photo d6fad301-7d1b-423d-a2b6-c4c19f15fe5e.jpg
Pin It
Related Posts Plugin for WordPress, Blogger...