Hi Everyone!
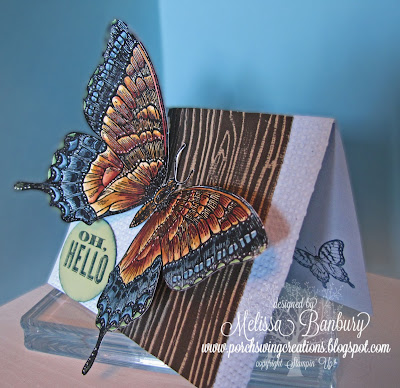
Hope you all had a great weekend! I am really really wishing Spring would arrive - at this time of the Winter season I usually feel as though it will never ever get here! So to bring up my spirits I made a card with this beautiful Swallowtail stamp. Isn't it a gorgeous stamp? The detail is amazing and its so so so much fun to color! I spent way too long coloring this one (my sister's opinion, not mine LOL) but I just couldn't stop layering the color. The depth you can gain with just a few colors will surprise you! I can't wait to try it in a few different color combinations!
Supplies:
Stamp sets: Swallowtail, Oh, Hello
Cardstock: Whisper White, Bashful Blue, Early Espresso Core'dinations, Certainly Celery
Ink: Versamark, Midnight Muse
Markers: So Saffron, More Mustard, Cajun Craze, Cherry Cobbler, Bashful Blue, Marina Mist, Island Indigo, Midnight Muse, Certainly Celery, Wild Wasabi, Garden Green
Accessories: Black embossing powder, Square Lattice embossing folder, Woodgrain embossing folder, Blender pen, white gel pen, Stampin' dimensionals, Sanding block, sponges, 1 1/4" circle punch, paper snips
Because this image is so large I have seen many people stamp half or 3/4 of the butterfly. I really wanted the full butterfly so I opted to stamp the image on Whisper White with Versamark then heat emboss with black embossing powder. After coloring the image I cut it out with paper snips and gently creased a fold on either side of the butterflies body. I then added only one dimensional on the body when I attached it to the card front. It really gives the appearance that the butterfly has just landed and fluttering its wings. If you are interested in how I've shaded my butterfly I used a technique called marker layering. The colors listed in my supply list are written exactly in the order I used them to color the image. I have more detailed instructions on marker layering HERE.
Until next time...
 Pin It


5 comments:
Oh. My. Goodness. This is absolutely GORGEOUS!! The butterfly has such a 3D appearance. BEAUTIFUL!!!
Girl....you are GOOD!! My jaw really did drop open (and stayed there for a few!) when I pulled up your post, I can't get over how real it looks! Absolutely beautiful! I don't think I'm familiar with the technique of marker layering....well, not where it turns out like this beauty! LOL! When I click on your link to follow for more detailed instructions for the technique of marker layering, it brings me back to this same post? Is there another detailed posting of instructions you have? Thanks Melissa, you sure do beautiful pieces of art!
Thank you for the kind comments!! I think I have corrected the link. It links to any previous works I've tagged "marker layering", so scroll past this post and all the others will be below. There are more detailed instructions on the very first post tagged Lest We Forget. Hope that helps!!
This is STUNNING! I have done some marker layering but nothing as gorgeous as this. Would you consider doing a tutorial kinda like the Northern Lights one? I would LOVVVEEEEE to see that! :-)
That's a great idea Linda! I have a few more ideas for this butterfly so maybe I'll just turn it into a tutorial. Stay tuned! ;)
Post a Comment