Monday, December 31, 2012

2012 Personal Favorite's Review


Happy New Years Eve Everyone!

For today's post I thought I would share a few of my favorite cards from this year.  When I started the blog in mid May of this year I wasn't sure what to expect.  I hoped I could gain a few readers and inspire a few more along the way.  I must say I am pleasantly surprised how much interest there is in my work - I absolutely LOVE paper crafting and am truly enjoying the blogging experience.  The blog has opened up new doors for my creativity that otherwise couldn't have existed and I am truly grateful for all the opportunities that have come to me this year and hope they continue into 2013!

The first post in the New Year will be my 100th - I can't believe I've made that many cards and projects in 7 months!  I hope to continue at this "speed" in the upcoming year; with so many products continually being released from Stampin' Up! I don't think I'll run out of ideas anytime soon!  I also have a few plans to make changes to the look of the blog in the upcoming days as well so stay tuned for that.

Thanks again to all my readers and for all the support and lovely comments - you'll never know how much it makes my day to receive them! :)

All the best to you and yours in the upcoming year!  Don't forget the BRAND NEW SPRING MINI goes live on JANUARY 2ND!  This also kicks off SALE-A-BRATION time - free products - Yippee!!
webbanner-002copy Pin It

Friday, December 28, 2012

Faux Flannel


Hi All!

I dug through my card archives to find a card to share with you today.  I made this one last Christmas using a technique called Faux Flannel.  Looking back at these older cards really puts my card making skills into perspective - proof that practice is an essential tool of any craft...I would NEVER let ribbon mitred corners be so out of line anymore! LOL 

If you have never heard of this technique here's a quick step by step to get you on your way.  The results really do look like flannel and make your card front super soft! 

Supplies:

Stamp sets: Christmas Lodge, Dasher (retired)
Cardstock: Whisper White, Island Indigo, Early Espresso
Ink: Basic Black
Accessories: Spray glue, 2 ply facial tissue (the thicker the tissue the better), modern label punch, Early Espresso grosgrain ribbon (retired), embossing plate (retired), snail

Begin with a piece of Whisper White cardstock.  Stamp images in a dark neutral ink to match your cardstock choice.  Lightly spray the WW cardstock with a mist of spray glue.  Separate a piece of facial tissue and gently press one piece onto the WW cardstock.  Let completely dry.  From here you can stamp over the facial tissue or add Dazzling Diamonds for a shimmery effect.  If your wondering where the Dasher stamp set was used - the little snowflakes in the sky are the snowflakes found in his antlers :)

Just a note to let you know that new items have been added to the Clearance Rack in the last couple of days.  If your interested in checking it out, click the button at the top left sidebar and it will take you directly there.

Also, I've decided to finally join the Twitter band wagon!  I think it will take me a bit to learn my way to navigate around all the #'s and @'s but I love social media so I'm jumping in with both feet!  I'd love to have you follow me and join in on the conversation.  You can click on the follow me link on the right sidebar or find me @mbanbury_psc.  Tips and tricks would be most welcomed :)

Have a wonderful day everyone!
webbanner-002copy Pin It

Thursday, December 27, 2012

Happy Birthday Dad!


Hi Everyone!

Hope you all had a wonderful Christmas!  I'm currently in the slow process of re-organizing closets and toy storage bins (groan).  I've come to the conclusion I should use Christmas as my Spring cleaning time.  Taking down decorations is a perfect time to do a really good house cleaning and receiving new clothes and toys forces you to clean a closet or two to make room for them all!  Now to get motivated...I'd much much much rather be working in my stamp room ;)

As you've probably already figured out by the title of this post, today's card is the one I made for my Dad's birthday; which is today.  Birthday's so close to Christmas are challenging - we've always tried to separate the two but its hard to not mesh them together when your birthday gifts are sitting under the Christmas tree!  This year after opening gifts we realized he hadn't even opened his Christmas gift from my sister and I - it accidentally got piled with the birthday gifts!

Anyway, back to the card.  I was short on inspiration for a male card this year, so I spent a few minutes looking at other Stampin' Up! demonstrators cards.  Michelle Zindorf has always been a great inspiration to me; her work with a brayer is beyond AMAZING.  I found a card she had done with a background very similar to what I did here - I loved it and it looked masculine so I ran with it. 

Supplies:

Stamp sets: Countryside, A Word for You
Cardstock: Whisper White, Tempting Turquoise, Early Espresso Core'dinations
Ink: River Rock, Old Olive, Basic Black
Accessories: Stampin write markers, sponges, 3/16" metallic brads, Word Window punch, Woodgrain embossing folder, snail

To create the background, ink the upper portion of the Whisper White cardstock with River Rock ink using the Direct to Paper technique (hold your ink pad on a slight angle and rub across your paper in a sweeping motion).  With a ruler and River Rock marker, draw the barn board lines.  Sponge the grass with Old Olive ink.  Stamp the image in Basic Black and color in with markers.  Create a shadow below the image with a River Rock marker.  Stamp sentiment in Basic Black.  Sponge all edges with Basic Black and assemble card.

That's all for now; back to organizing I go!
webbanner-002copy Pin It

Monday, December 24, 2012

Happy Holidays!


Before I sign off for a couple of days to enjoy the Holidays with my family I wanted to share one more little project with you.  This is a wall plaque I had my husband cut from MDF over the weekend.  I painted the entire surface and edges with white acrylic paint and let fully dry.  I then masked off the snow banks and sponged the following colors: Crumb Cake, Soft Suede, More Mustard, Cajun Craze, and Chocolate Chip.  With the snowbanks still masked, I stamped the trees from the set Lovely as a Tree across the skyline with Black Staz-On ink.  I removed the mask and randomly stamped the fir tree from the same set across the foreground; adding Soft Suede highlights under each tree.  Snowflakes were added with a white gel pen and the larger ones with White Staz-On ink.  As a finishing touch I stamped the children and snowmen from the Winter Memories set and colored them in with markers.  Here's a closer look:


Supplies:

Stamp sets: Lovely as a Tree, Winter Memories, Christmas Lodge
Cardstock: none
Ink: Crumb Cake, Soft Suede, More Mustard, Cajun Craze, Chocolate Chip, Black Staz-On, White Staz-On
Accessories: wood wall plaque, sponges, Stampin' write markers, Stamp-a-ma-jig, white gel pen

I am so pleased with the way this project turned out - I think it will be one of those pieces that brings a smile to my face each year I unpack it to display for the Holiday Season!

Well, that's it for me for the next few days.  I would like to wish you and your family a Safe, Happy, and Healthy Holiday Season.  I hope you take a moment or two to enjoy in the true magic the Season!  Thank you for visiting my blog and allowing me to share a little piece of myself with you - the comments are always wonderful and welcomed!  I'd like to leave you with my children's Santa picture from this year - I'll give you three guesses who wanted to be there and who didn't! LOL

MERRY CHRISTMAS!
webbanner-002copy Pin It

Friday, December 21, 2012

Forest Snowfall


Happy Friday!

Well, just like that the world didn't end and another week is simply over.  I truly can't believe how fast this year has sped by; only a few sleeps until Santa arrives and only a few more after that we welcome in 2013!
I have a few more Christmas/Winter cards to share with you before then, including this one.  I tried to play around with light and shadow on this one with sponges but the real helper to achieving this look was my white gel pen.  Here's a quick look at how I did it...

Supplies:

Stamp sets: Christmas Lodge, Dasher (retired)
Cardstock: Glossy White, Very Vanilla, Chocolate Chip
Ink (in order of use): Crumb Cake, Soft Suede, More Mustard, Pool Party, Chocolate Chip, Basic Black, White Staz-On
Accessories: White gel pen, Stamp-a-ma-jig, sponges, Large Rhinestones, Tombow adhesive

Begin with a piece of Glossy White cardstock - in this instance mine measures 5" x 5".  Stamp trees from the Christmas Lodge set in Basic Black.  Sponge Crumb Cake lightly over entire image.  Sponge Soft Suede next, leaving some white space in the center of the image.  Next, sponge More Mustard focusing along the edges.  Add a small touch of Pool Party into the portion of the image that was left as white space.  Lastly, sponge Chocolate Chip once again focusing on the edges, leaving the center quite light.  Stamp the deer image in Basic Black.
Now to add the finishing touches that really make the image come to life.  With a white gel pen, add snow to the sky, trees, and ground (add quite a bit to create the illusion of snow ground cover).  Add a few larger dots within the trees.  Finish by highlighting the larger dots with the end of a cotton swab dipped in White Staz-On ink - by doing this it truly makes the snowflakes "glow".

I hope to squeeze one more post in before Christmas!  Have a great weekend!
webbanner-002copy Pin It

Thursday, December 20, 2012

Christmas in Owlville


Good Day!

I had so much great feedback from my Halloween in Owlville post that I decided I should create a similar scene for the Holiday Season.  Have I mentioned how much I adore my Owl Punch? I think I would have a melt down if Stampin' Up! ever retired it!  Everytime I pick it up to use it I always have a hoot! (haha ok, only one pun for the day!)

I'll try my best to list all the materials used, but if you noticed I've forgotten something, please let me know!  I have seen the Santa and Elf made many times before in my travels across the net but the gingerbread owl, snowman owl, angel, and Nutcracker our of my own imagination.

Supplies:

Stamp sets: Chock-Full of Cheer, Snow Much Fun
Cardstock: Watercolor paper, Whisper White, Lucky Limenade, Snow Festival DSP, Cherry Cobbler, Basic Black, Daffodil Delight, Gumball Green, Soft Suede, Early Espresso, Pumpkin Pie, Brights Collection DSP, Pretty in Pink, Brushed Gold, Summer Smooches DSP
Ink: Midnight Muse, Early Espresso
Accessories: Owl punch, Window punch, Beautiful Wings embosslits, white gel pen, Midnight Muse, Certainly Celery, Lucky Limenade, Wild Wasabi markers, Tombow adhesive, Stampin' dimensionals

Hope you enjoyed these little guys!  I hope to be back tomorrow with another creation, that is of course if the world doesn't end at midnight ;)  I really toyed with the idea of not doing laundry and cleaning the house today just in case, but then a friend reminded me of the old saying 'always wear clean underwear because you just never know what could happen'.  Long story short? House is clean and laundry is put away...see you tomorrow!! Thanks so much for stopping by!

webbanner-002copy Pin It

Wednesday, December 19, 2012

Laundry Day at the North Pole


Hi All!

Sometimes inspiration finds you at the oddest of times, like when you should be going to bed because you know morning ALWAYS comes way too early.  After putting my boys to bed last night my husband and I started watching The Santa Claus.  Near the end of the movie the idea for this card sprung into my head.  Now a normal person might just jot the idea down, go to bed, and deal with it in the morning...but nope, not me.  Ten o'clock at night I flipped on the light to my stamp room and got to work.  This is what I came up with by 11:30...I think its pretty darn cute (if I do say so myself LOL)...I mean even the North Pole has laundry, no??  That little Owl Punch was definitely a good investment...oh the things you can create with it and a little imagination!!

Supplies:

Stamp sets: Chock-Full of Cheer, Snowflake Soiree
Cardstock: Whisper White, Snow Festival DSP, Midnight Muse, Summer Smooches DSP, Cherry Cobbler, Basic Black
Ink: Midnight Muse
Accessories: Real Red, Garden Green, Basic Black write markers, linen thread, mini clothes pins, owl punch, modern label punch, small oval punch, sponges, mini glue dots, Stampin' dimensionals, Tobow liquid glue, paper snips

Hope you enjoyed this one!  I have another card that utilizes the Owl Punch that I'll share with you tomorrow.  Until then have a great day! ONLY 6 MORE SLEEPS UNTIL CHRISTMAS!
webbanner-002copy Pin It

Tuesday, December 18, 2012

Waterless Snowglobe


Hey All!

I have a quick little project to share with you today that makes a great Holiday decoration!  I would absolutely LOVE to have a little Christmas Village set up in my home one day.  Right now though I don't have a space that's 'un-reachable' to little hands so until they understand that they can't touch I patiently wait; and come up with other ideas to use those little figurines :)  I found this while searching on Pinterest one day and just had to make one for me!

Supplies:

Mason jar, fake snow, small ornament (I found this one at Walmart - it runs on batteries and lights up!), Dazzling Diamonds, hot glue gun

Process is super simple.  Hot glue the figure down to the jar lid.  Glue a little fake snow around the figurine on top of the jar lid.  Put additional fake snow and Dazzling Diamonds into the jar.  Twist on the lid (the wire was thin enough to fit between the jar and lid with no problem) and give it a shake.


Super cute, huh?  It looks adorable lit at night beside my shortbread houses - the Dazzling Diamonds don't really show in the pictures but its fine enough that it sticks to the sides of the jar and really sparkles at night!

See you next time!  Don't forget about the Clearance Rack Blitz going on right now!  Savings up to 80% off and for the first time EVER discontinued stamp sets are available!
webbanner-002copy Pin It

Monday, December 17, 2012

Boxed Bouquet and Paper Bow Tutorial


Hi Everyone!

I hope all the hustle and bustle in the week before Christmas hasn't caught up to you yet!  I'm really looking forward to this week - I'm completely caught up except for a few last minute things that just can't be done until last minute so I'm going to enjoy it!  Evenings spent by the wood stove with a Holiday movie on is the perfect way to ring in the Season, I think.  We've even managed a quick trip for the boys to see Santa which was met with mixed emotions...one little boy with a huge smile and another with tears and a quivering lip! 

Today I thought I'd share the little boxed bouquet gifts I gave to my regular card club members for Christmas.  The flower's were made with the same tutorial I used to make the last few paper flower bouquets I've shown on my blog which I purchased from Leigha Rock at Diary of Two Crafty Girls.  The box is a template I found online that is quick and simple with only a few cuts and pieces of sticky strip needed.  I'll include all measurements and a quick tutorial at the end of this post.


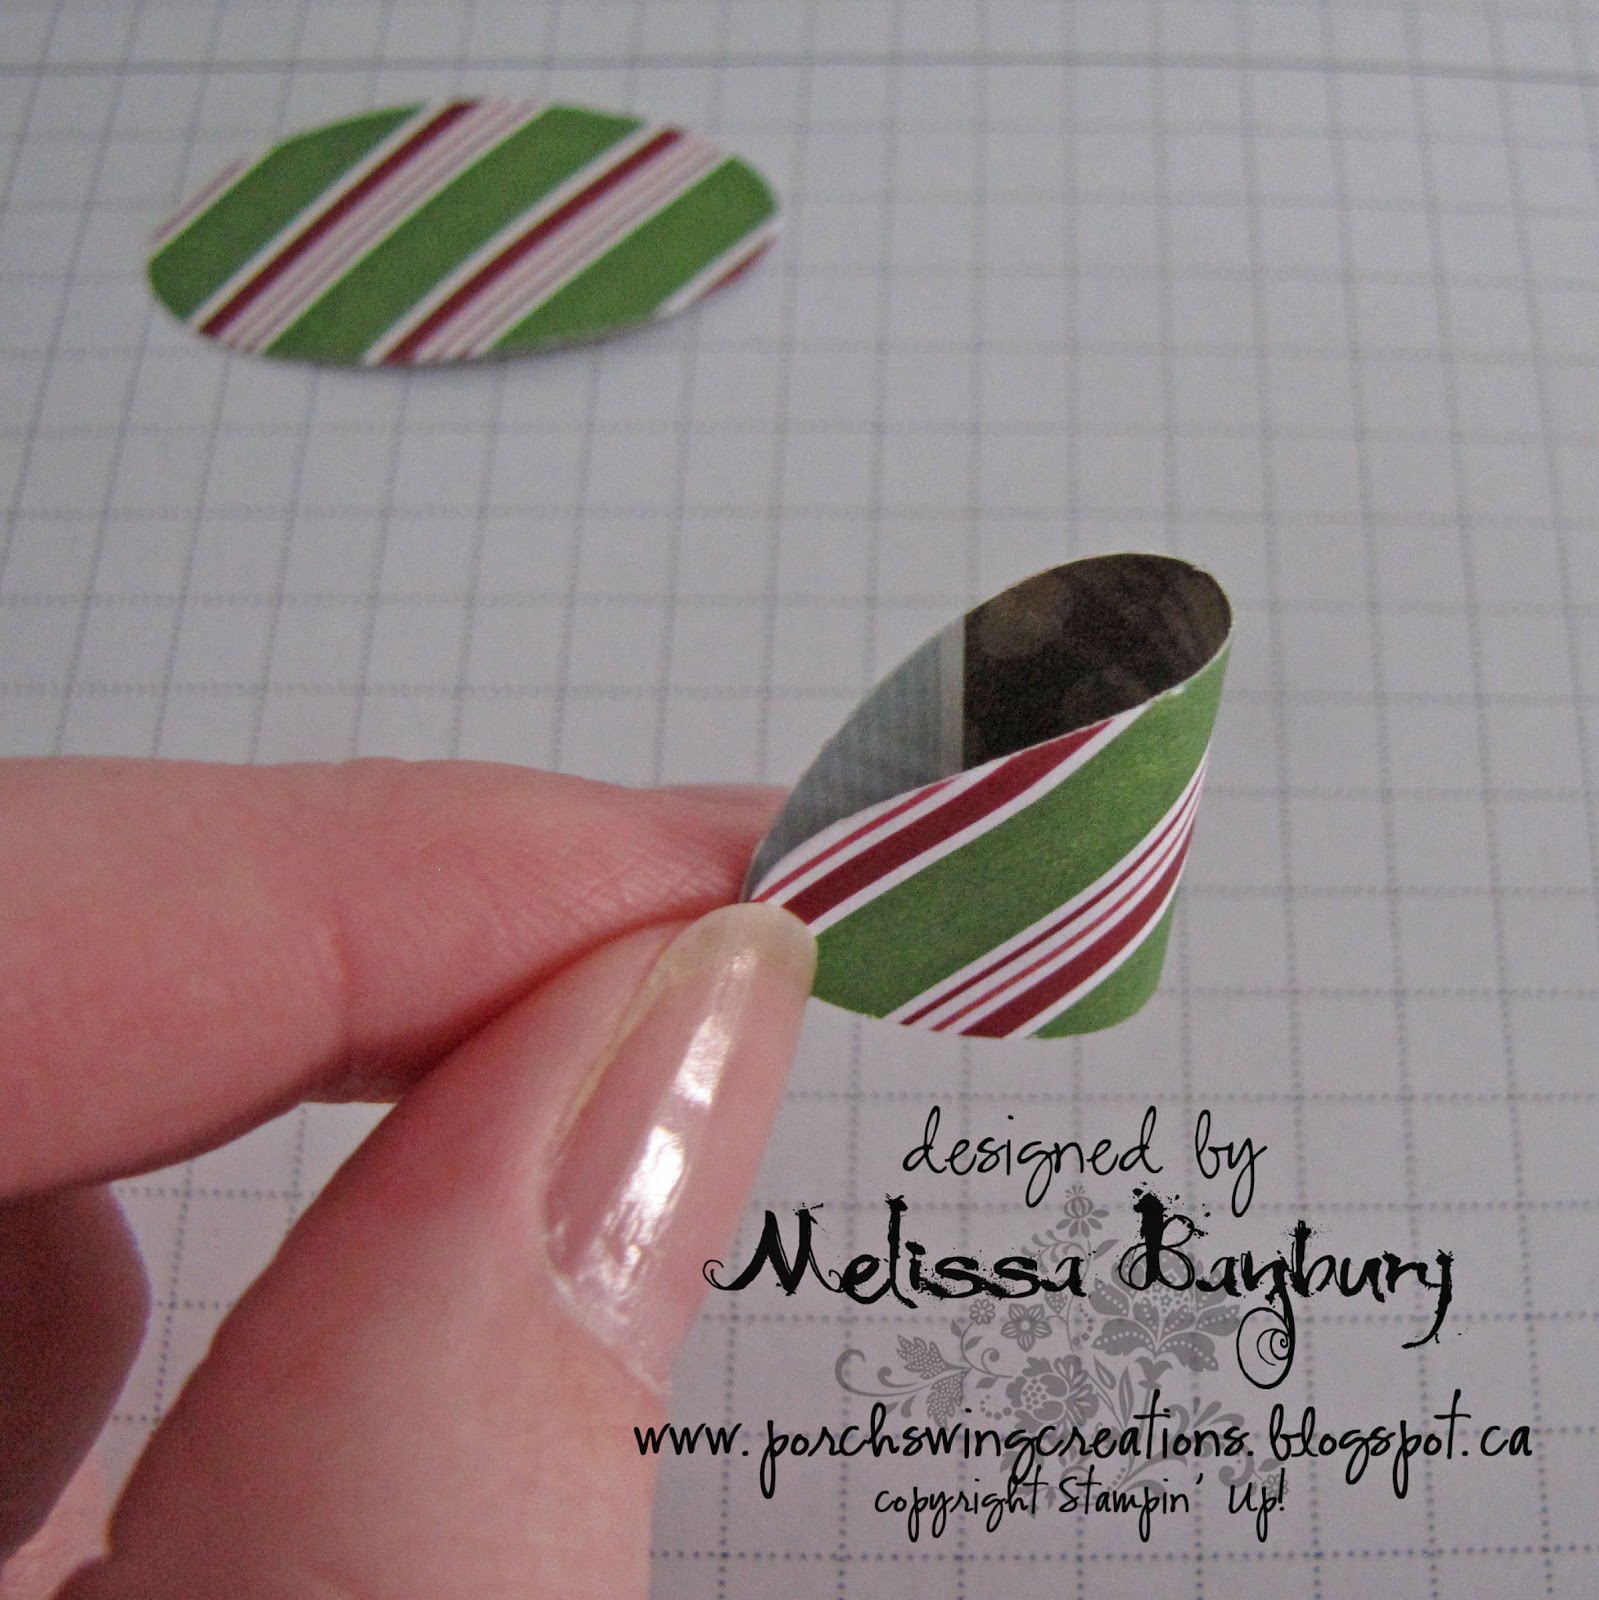
I have received a few emails asking how I made the paper bows in the post CAS Serene Snowflakes which are the same as the ones I used on these little boxes.  They are so easy to make I thought I would do a quick tutorial for you today along with this post.  I learned how to make them via another fellow Stampin' Up! demonstrator, Connie Collins.

Supplies:

Stamp sets: none
Cardstock: DSP of your choice
Ink: none
Accessories: Large oval punch, paper snips, paper cutter, mini glue dots

Begin by cutting the above pieces.  This will make ONE bow.


Using the handle of a stylus tool or pen, gently wrap each of the oval pieces around the tool and secure the ends together with a mini glue dot.


Apply another glue dot to the back of each oval piece


Center and adhere each folded oval onto the strip measuring 4 1/4".


Apply a glue dot on each end of the short strip of paper on the backside.  Wrap and adhere around the center point where the two ovals meet.


Voila! A perfect paper bow!

To make the box you need a piece of DSP measuring 6" x 12".  With a scoring tool, score the side measuring 12" at 1 3/4", 5 1/4", 7", and 10 1/2".  Turn the paper and on the 6" long side, score at 1" and
4 1/4".  While looking at the template in landscape position you'll see two score lines; one measuring 1" and the other 1 3/4".  Cut along each one of the vertical 1 3/4" score lines until you meet the first horizontal score line.  These tabs will form the bottom of your box.  Fold the 1" piece so the backside of the DSP will show on the front of the box.  Apply sticky strip to the bottom tabs and last vertical tab and adhere your box together.  Decorate as desired.  Hope that makes sense, if you any questions please message me and I'll attempt a quick photo tutorial :)

Before signing off today I have to send my thoughts, prayers, and deepest sympathies to the families that lost loved ones in Newtown, Connecticut last week.  My heart breaks with the thought of what they are going through at this moment and all the difficult moments yet to come.  Life will never be the same - I pray they find comfort of family, friends, and neighbours throughout the Holidays and the long months ahead.  Heaven gained twenty-six new and beautiful Guardian Angels much too soon...

Until next time...
webbanner-002copy
Pin It

Friday, December 14, 2012

All Wrapped Up Gift Card Holder


Happy Friday!


Before I get started on today's little project I had to share some exciting news Stampin' Up! released today.  Over 300+ items have been added to the Clearance Rack TODAY with discounts off of regular priced items up to 80% off!  Even more exciting for the first time EVER they have added retired stamp sets to the list up to 40% off the retail price!  How exciting is that?!  I can't wait to find a little extra time to sit down and look at all the additions - please keep in mind if you are interested in any of the items act fast!  Products are only available in limited quantities.  Visit my online store HERE to check it all out.

On to today's project - a gift wrapped gift card holder.  I love ideas like this and wish I could take credit for creating it, but another fellow Stampin' Up! demonstrator, France Martin takes the prize!  Here's a quick overview on how to put one together yourself.

Supplies:

Stamp sets: Chock-Full of Cheer
Cardstock: Real Red, Gumball Green, Whisper White, Snow Festival DSP
Ink: Cherry Cobbler (should have used Real Red...oops!)
Accessories: Brights Glimmer Brads, 1 1/4" circle punch, 1 3/4" circle punch, Scallop edge punch, Large oval punch, Extra Large oval punch, Simply Scored scoring tool, piercing tool, snail

Begin with two pieces of DSP one measuring 9" x 3 1/4" for the bottom portion and one measuring
4 1/4" x 3" for the top portion of the holder.  Score the 9" long piece at 2 1/2" and 6 3/4".  Fold along the score lines and apply adhesive along the seam and bottom to create the base of the box.  Score the 3" piece at 1 1/2".  Fold along score lines.  Using a piercing tool, pierce a hole on the left hand side of the bottom and top of the box pieces and insert a brad.  This will form a hinge to the box can be opened and closed.  Place a brad on the right hand side of the box on the lid portion only so the box can still open and close freely (strictly for decoration only).  The insert is made a piece of Whisper White cardstock measuring 3" x 3 1/2"; a 1 1/4" circle was punched from DSP and folded over the top of the insert to help pull the gift card from the box.  The bow at the top of the box was made by first punching out a large oval than an extra large oval centered over top of the negative portion of the large oval and punch again (wow that sounds way more confusing than it actually is LOL).  Then go crazy decorating - think of all the different ways you could decorate your little box!

Hope this helps you with the last of your Christmas "wrapping".  I finished my baking and stayed up until midnight last night to finish all my wrapping and can now say I'm offically ready for Christmas!  It also means I can spend a little spare time stamping for me now too ;)  Those Spring Catalogue items are tempting me and I can't wait to dig in!

Hope you have a wonderful weekend!  See you all again next week!
webbanner-002copy
Pin It

Thursday, December 13, 2012

CAS Serene Snowflakes


Hello!

Another CAS (clean and simple) card to share with you today.  It couldn't get any simpler than this!  I love how its another unexpected color combo - Christmas does not always have to be the traditional red and green!

I know were in the midst of the Holiday Season but I'm so excited for the new Spring Catalogue and Sale-A-Bration catalogue, available January 3rd!  I received my first box of goodies yesterday and now can't wait to start creating with it all!  If I find time between now and Christmas for a little extra stamp time I'll be sure to share my creations with you!

Supplies:

Stamp sets: Serene Snowflakes, Winter Memories
Cardstock: Pool Party, Whisper White, Neutral Designer Series DSP
Ink: none
Accessories: Versamark, silver embossing powder, Lacy Brocade embossing folder, large oval punch, mini glue dots, snail, tombow adhesive, heat gun

See you next time!
webbanner-002copy Pin It

Monday, December 10, 2012

IPhone Birthday


Hi Everyone!

My sister's birthday was a couple of weeks ago and I forgot to share this card then with everyone.  We recently made the leap into the IPhone world so I thought it might be neat to try re-create a birthday card that looked like her newest baby LOL.  If you notice, the icons spell out 'Happy Birthday Rynn' - I found a great site that lists all the Apps with a letter as its icon and simply cut them out with paper snips and glued them down.

Here's a look at the back of the card:


Supplies:

Stamp sets: none
Cardstock: Glossy White, Window sheet, Basic Black, Summer Smooches
Ink: none
Accessories: 3/16" corner punch, 1" circle punch, owl punch, white gel pen, Tombow adhesive

As her birthday gift I purchased a clear case for her phone and made these inserts - I bought one for myself too simply because the possibilities are endless!  Your phone never has to look the same for a fraction of the cost!  I want to make one for every holiday!


Wouldn't this make a great holiday gift??  Homemade and personal - exactly what a perfect Christmas gift should be!  Hope I've inspired you!

Until next time...
webbanner-002copy

Pin It

Friday, December 7, 2012

Christmas Centerpiece


Happy Friday!

I just finished this Christmas centerpiece and had to share it with you!  I created it using another great tutorial I purchased from Leigha Rock at Diary of Two Crafty Girls blog.  These roses look so real that you honestly want to lean over and smell them!  This centerpieces uses a dozen roses made from Very Vanilla cardstock, along with filler stems I bought at a local craft store.  Arranged in a glass vase with a few ornaments inside and some Cherry Cobbler tulle ribbon tied in a bow, this arrangement is perfectly elegant for any Holiday decor!  Check out her site to make your very own!


Thanks so much for looking!  See you again soon!
webbanner-002copy

Pin It

Thursday, December 6, 2012

Candy Cane Body Scrub Set


Hi Everyone!

Just a quick post today to share another project I created for this month's Wrapping Up the Holidays for U Stamp with Dawn and Friends - Candy Cane Body Scrub!  I can't even begin to tell you how DIVINE this smells!  It would make such a great hostess gift or as a little something for a girlfriend to pamper herself with this Holiday Season.  If your interested in this or any of the other 40+ tutorials offered, head on over to http://ustampwithdawnandfriendsbloghop.ning.com/ to sign up - there is a new tutorial posted every 12 hours!!

Here's another tutorial offered on Wrapping Up the Holidays that I just had to share with you!  It's made by the very talented Teresa Giordano!  I can't wait to make a few of these not only to hold gift cards but to hang on the tree as a wonderful decoration!  Aren't they the cutest??


That's all for today!  Until my next post...
webbanner-002copy Pin It

Tuesday, December 4, 2012

Merry Snowflakes


Do you love the Christmas ornament on the cover of the Holiday Catalogue but don't think you can recreate it on your own?  Well, now all the guesswork and cutting has been done for you in the NEW Ornamental Elegance Kit!  Everything you need to make your very own ornament is included in one package - what could be easier?

The Ornamental Elegance Kit (132832) is $17.95 and includes:
  • Die-Cut Cardstock Elements
  • Cherry Cobbler 3-1/2" Scalloped Tulle Ribbon
  • Natural Linen Thread
  • Vintage Faceted Designer Buttons
  • Large Pearl Basic Jewels
Order these now so you will have plenty of time to make them for Christmas gifting--or for your family tree! Available only while supplies last.

Today's card is a simple one with a technique I've named Embossed Highlighting.  I've seen it numerous times before and is so easy to do.  Simply emboss your image by stamping in Versamark then using clear embossing powder.  Then with a sponge dauber or a regular sponge, rub ink over your embossed image to watch it magically reappear!  Kind of looks like looking through a frosted window...now I need a hot chocolate! LOL

Supplies:

Stamp sets: Snowflake Soiree
Cardstock: Whisper White
Ink: Midnight Muse
Accessories: Versamark, clear embossing powder, sponge dauber, Midnight Muse stitched ribbon, sticky strip

Have a great day everyone!
webbanner-002copy Pin It
Related Posts Plugin for WordPress, Blogger...